Sgt. James Ward VC.- 75 (NZ) Sqn RAF Feltwell.

We have seen through the many ‘Heroic tales‘, acts of daring and valour that have astounded the average man in the street. Acts of heroism that were completed without forethought or consideration for personal safety, where the lives of fellow crewmen and their aircraft were put far beyond that of their own.

Some of these included flying an aircraft with astonishing injuries, staying with an aircraft until such times as all the crew have either left – or because they have been unable to leave – remaining at the controls to attempt a landing without help or hydraulics. There have even been cases of airmen exiting the aircraft to extinguish external fires whilst both at altitude and at speed. Indeed this is not a solitary occurrence; a number of airmen have been known to have performed such acts, some successfully others less so. But the fact that an airmen is willing to perform such an act of bravery, is in itself, incredible.

One such action occurred in July 1941 and was performed by 2nd Pilot Sgt. James Allen Ward (RNZAF) of 75 (NZ) Sqn, RAF Feltwell.

Sgt. James Allan Ward, 75 (NZ) Squadron RAF, standing in the cockpit of his Vickers Wellington Mark IC, L7818 ‘AA-V’, at Feltwell, Norfolk. (© IWM (CH 2963)

Sgt. Ward, the Son of Mr. Percy Harold Ward and Mrs. Ada May Ward, of Wanganui, Wellington, New Zealand was born on 14th June 1919, and was, following his training, posted to 75 (NZ) Sqn then at RAF Feltwell in Norfolk. The squadron were operating the new Vickers Wellington MK.Ic, or ‘Wimpey‘ as it was affectionately known, on a bombing mission to Munster in Germany.

Take off was at 23.10 on the night of July 7th 1941. On board (aircraft CNF.994/L7818) that night were: Canadian S/L. R. Widdowson (Pilot); Sgts. J. Ward (2nd Pilot); L.A. Lawton (Navigator); Mason (Wireless Op); Evans (Front Gunner) and A. Box (Rear Gunner), as part of a force of ten Wimpeys from Feltwell along with thirty-nine others from nearby bases.

The flight out was uneventful, with no interactions with either flak nor Luftwaffe night fighters. Over the target, bombs were released and several fires were seen to light, although German reports stated that little damage was done and no casualties were incurred.

The return leg took the formation over the Zuider Zee at which point the Wellington was strafed by canon fire from an Me 110 flying beneath it. As shells ripped though the fuselage, the rear gunner was injured in the foot but managed to return fire sending the attacker plummeting to Earth with heavy smoke pouring from the port engine.

Shortly after this, the Wellington’s wing, housing a fuel line damaged in the attack, itself caught fire and with the aircraft having a fabric covering, it was only a matter of time before it would also fall to Earth in a massive fireball.

With S/L Widdowson struggling to control the aircraft, which had had half its rudder shot away, its elevators severely damaged, hydraulics ruptured, flaps inoperable and bomb doors opened and damaged; a decision had to be made as to what to do next.

A bale out appeared to be the only safe and viable option. S/L. Widdowson gave the order and the crew began preparations to depart the stricken aircraft. Almost as a last minute attempt to save it, Widdowson instructed the crew to try and extinguish the fire, and they began ripping away the fabric covering the geodesic framework. Ward, grabbing a fire extinguisher, shot jets of agent through the hole toward the fire. At altitude and speed, the air stream was far too strong and the attempt had little effect on the burning engine.

At this point, and without attention to his own safety, Sgt. Ward decided to climb out and try to smother the fire with a canvas engine cover that had been used to raise S/L. Widdowson’s seat. Much to the dismay and protests of the other crewmen, Ward grabbed a parachute and attached a rope to himself and the Navigator, and began to climb out through the astrodome located between the wings in the fuselage’s ceiling. By punching holes in the aircraft’s fabric, he was able retain a foot and hand hold on to the aircraft, manoeuvring himself tight against the air frame toward the burning wing.

Once out onto the starboard wing, he approached the fire and pushed the canvas into the hole left by the flames. The fire burning furiously by now, was intense, and caused Sgt. Ward great pain forcing him to withdraw his hand several times before the slipstream finally caught the canvas tearing it from the hole and out into the dark night sky.

Being partially successful, there was little left for Sgt. Ward to do, so he began the arduous journey back toward the aircraft’s fuselage and its relative safety. By smothering the fire as he did, Ward’s attempts had made a difference, and shortly afterwards the fire extinguished itself enabling both the aircraft and crew to return to England safely making an emergency landing at RAF Newmarket Heath.

The Wellington with ‘hand-tholes’ after Sgt Ward tried to extinguish the fire.  (A) The hole caused by shell and, afterwards, by fire; (B) The Astro-Hatch through which Sergeant Ward, VC climbed; (1, 2 and 3) Holes kicked in the fabric by Sergeant Ward.(IWM CH3223)

Landing at 04:30, the Wellington came to a stop only after striking a fence on the airfield boundary, its brakes being totally unusable.

For his action, Sgt. James (Jimmy) Ward was awarded the Victoria Cross, the highest honour for bravery and extraordinary courage; he was the first New Zealander to win such an award during the Second World War. S/L. Widdowson for his actions, was awarded an immediate D.F.C. whilst Sgt. Box, the D.F.M.

At the time of the incident Sgt. Ward was only 22 years of age, he would be given his own crew and would go on to complete ten missions in total before, on the eleventh, being shot down and killed in another Wellington of 75 (NZ) Sqn over Hamburg on September 15th 1941.

Sgt Ward’s death brought a severe blow to the crews of 75 (NZ) Sqn, who perhaps thinking him invincible, went on to perform with great pride and determination in the face of great adversity. With over 8,000 sorties flown, the highest of any squadron in 3 Group, came a high cost, 193 aircraft being lost, the second highest of any Bomber Command Squadron of the Second World War.

Sgt Ward’s body was recovered from the crash that killed him, and along with his three comrades was laid to rest in the Ohlsdorf Cemetery in Hamburg, CWCG Plot 5A. A1. 9.

The report of Sgt. Ward’s VC. (Auckland Library Heritage Collection : 13 August 1941 : Item ref # AWNS 19410813-23-1)

Sgt. Ward’s citation appeared in the London Gazette “No. 35238” on 5 August 1941 p. 4515 and reads:

“On the night of 7th July, 1941, Sergeant Ward was second pilot of a Wellington returning from an attack on Munster.

When flying over the Zuider Zee at 13,000 feet, the aircraft was attacked from beneath by a Messerschmitt which secured hits with cannon shell and incendiary bullets. The rear gunner was wounded in the foot but delivered a burst of fire which sent the enemy fighter down, apparently out of control.

Fire then broke out near the starboard engine and, fed by petrol from a split pipe, quickly gained an alarming hold and threatened to spread to the entire wing. The crew forced a hole in the fuselage and made strenuous efforts to reduce the fire with extinguishers, and even the coffee in their vacuum flasks, but without success. They were then warned to be ready to abandon the aircraft.

As a last resort, Sergeant Ward volunteered to make an attempt to smother the fire with an engine cover which happened to be in use as a cushion. At first he proposed to discard his parachute, to reduce wind resistance, but was finally persuaded to take it. A rope from the dingy was tied to him, though this was of little help and might have become a danger had he been blown off the aircraft. With the help of the navigator, he then climbed through the narrow astro-hatch and put on his parachute. The bomber was flying at a reduced speed but the wind pressure must have been sufficient to render the operation one of extreme difficulty.

Breaking the fabric to make hand and foot holds where necessary, and also taking advantage of existing holes in the fabric, Sergeant Ward succeeded in descending three feet to the wing and proceeding another three feet to a position behind the engine, despite the slipstream from the airscrew which nearly blew him off the wing. Lying in this precarious position, he smothered the fire in the wing fabric and tried to push the cover into the hole in the wing and on to the leaking pipe from which the fire came. As soon as he removed his hand, however, the terrific wind blew the cover out and when he tried again it was lost. Tired as he was, he was able with the navigator’s assistance, to make successfully the perilous journey back into the aircraft.

There was now no danger of fire spreading from the petrol pipe, as there was no fabric left nearby, and in due course it burnt itself out. When the aircraft was nearly home some petrol which had collected in the wing blazed up furiously but died down quite suddenly. A safe landing was then made despite the damage sustained by the aircraft.

The flight home had been made possible by the gallant action of Sergeant Ward in extinguishing the fire on the wing in circumstances of the greatest difficulty and at the risk of his life.”

Sources.

National Archives – AIR 27/645/34, AIR 27/645/33

Auckland War Memorial Museum Website.

September 8th 1943 – Tragedy at RAF Mepal.

On the night of September 8/9th 1943,  a force of 257 aircraft comprising 119 Wellingtons, 112 Stirlings, 16 Mosquitoes and 10 Halifaxes took off from various bases around the U.K. to bomb the Nazi gun positions at Boulogne. Included in this force were aircraft from the RAF’s Operational Training Units, and for the first time of the war, five B-17s flown by US aircrews of the USAAF’s 422nd BS, 305th BG at Grafton Underwood. This was the first of eight such missions to test the feasibility of the USAAF carrying out night operations over Europe.  After the remaining seven missions, in which the squadron had dropped 68 tons of bombs, the idea was scrapped, the concept considered ‘uneconomical’ although the aircraft themselves proved to be more than capable of the operations.

RAF Mepal - memorial

RAF Memorial – Mepal

The Gun battery targeted, was the emplacement that housed the Germans’ long-range guns, and the target wold be marked by Oboe Mosquitoes. With good weather and clear visibility, navigation was excellent, allowing the main force to successfully drop their bombs in the target area causing several huge explosions. However, not many fires were seen burning and the mission was not recorded as a success. Reports subsequently showed that the emplacement was undamaged due to both inaccurate marking by Pathfinders, and bombing by the main force. However, as both anti-aircraft fire and night fighter activity were light, no aircraft were lost during the flight making it a rather an uneventful night.

However, the mission was not all plain sailing, and whilst all crews returned, the night was marred by some very tragic events.

Three Stirlings were to take off from their various bases that night: at 21:00 hrs from Chedburgh, Stirling MK. III, EF136, piloted by F/S. R. Bunce of 620 Sqn; at 21:30, another Stirling MK.III, from 75 Sqn at RAF Mepal, BK809 ‘JN-T*1‘ piloted by F/O I.R.Menzies of the RNZAF; and lastly at 21:58 also from Chedburgh, Stirling MK. I, R9288 ‘BU-Q’ piloted by N.J. Tutt  of 214 Sqn.  Unfortunately all three aircraft were to suffer the same and uncanny fate, swinging violently on take off. The first EF136 crashed almost immediately, the second BK809 struck a fuel bowser, and the third R9288 ended up in the bomb dump. Miraculously in both the Chedburgh incidents there were no casualties at all, all fourteen crew men surviving what must have been one of their luckiest escapes of the war! The same cannot be said for the second though.

Stirling BK809 was part of a seventeen strong force of 75 Sqn aircraft. Each aircraft was carrying its full load made up of 1,000lb and 500lb bombs. As the Stirling was running along the runway, it swung violently, striking a fuel bowser which sent it careering into houses bordering the edge of the airfield.

One of the occupants of one of the houses, Mr. P. Smith, saw the aircraft approaching and ran into the street to warn others to get clear. As the aircraft struck the rear of the houses, it burst into flames causing some of the bombs to detonate. This brought considerable rubble down on the occupants of the second house, Mr and Mrs John Randall.

Mrs Randall managed to get out, her legs injured, whereupon she was met by a local fireman, Mr. A.E. Kirby of the National Fire Service. Mr. Kirby went on to help search in the wreckage of the house until his attempts were thwarted by another explosion. His body, along with that of Mr. Randall, was found the next day.

Two other people were also killed that night trying to provide assistance, those being F/Sgt Peter Gerald Dobson, RNZAF and Section Officer Joan Marjorie Easton WAAF. F/Sgt. Dobson was later mentioned in despatches. Three members of the crew lost their lives as a result of the accident, F/O. Menzies and F/O. N. Gale both died in the actual crash whilst Sgt. A. Mellor died later from injuries sustained in the accident.

A number of others were injured in the crash and one further member of the squadron, Cpl Terence Henry King B.E.M, was awarded the British Empire Medal “for his bravery that night in giving assistance“.

The mission on the night of September 8/9th 1943 will not go down as one of the most remarkable, even though  it was unique in many respects, but it will be remembered for the sad loss of crews, serving officers and civilians alike in what was a very tragic and sad event.

The crew of Stirling BK809 were:

F/O. Ian Robert Menzies RNZAF NZ415002. (Pilot).
P/O. Derek Albert Arthur Cordery RAFVR 136360. (Nav).
P/O. Norman Hathway Gale RAFVR 849986. (B/A).
Sgt. Ralph Herbert Barker RNZAF NZ417189. (W/O).
Sgt. Albert Leslie Mellor RAFVR 943914. (Flt. Eng).
Sgt. Bullivant G RAFVR 1395379. (Upp. G)
Sgt. Stewart Donald Muir RNZAF NZ416967. (R/G).

RAF Mepal was visited in Trail 11.

Sources and Further Reading.

*1 Chorley, 1996 “Bomber Command Losses 1943” notes this aircraft as AA-T.

National Archives: AIR 27/646/42: 75 Sqn ORB September 1943

Chorley, W.R., “Bomber Command Losses – 1943“, Midland Counties, (1996)

Middlebrook M., & Everitt C., “The Bomber Command War Diaries”  Midland Publishing, (1996)

Further details of this accident, the crews and those involved can be found on the 75 (NZ) Sqn blog. This includes the gravestones of those killed and a newspaper report of the event.

My thanks also go to Neil Bright for the initial  information.

Sgt. James Ward VC.- 75 (NZ) Sqn RAF Feltwell.

We have seen through the many ‘Heroic tales‘, acts of daring and valour that have astounded the average man in the street. Acts of heroism that were completed without forethought or consideration for personal safety, where the lives of fellow crewmen and their aircraft were put far beyond that of their own.

Some of these included flying an aircraft with astonishing injuries, staying with an aircraft until such times as all the crew have either left – or because they have been unable to leave – remaining at the controls to attempt a landing without help or hydraulics. There have even been cases of airmen exiting the aircraft to extinguish external fires whilst both at altitude and at speed. Indeed this is not a solitary occurrence; a number of airmen have been known to have performed such acts, some successfully others less so. But the fact that an airmen is willing to perform such an act of bravery, is in itself, incredible.

One such action occurred in July 1941 and was performed by 2nd Pilot Sgt. James Allen Ward (RNZAF) of 75 (NZ) Sqn, RAF Feltwell.

Sgt. James Allan Ward, 75 (NZ) Squadron RAF, standing in the cockpit of his Vickers Wellington Mark IC, L7818 ‘AA-V’, at Feltwell, Norfolk. (© IWM (CH 2963)

Sgt. Ward, the Son of Mr. Percy Harold Ward and Mrs. Ada May Ward, of Wanganui, Wellington, New Zealand was born on 14th June 1919, and was, following his training, posted to 75 (NZ) Sqn then at RAF Feltwell in Norfolk. The squadron were operating the new Vickers Wellington MK.Ic, or ‘Wimpey‘ as it was affectionately known, on a bombing mission to Munster in Germany.

Take off was at 23.10 on the night of July 7th 1941. On board (aircraft CNF.994/L7818) that night were: Canadian S/L. R. Widdowson (Pilot); Sgts. J. Ward (2nd Pilot); L.A. Lawton (Navigator); Mason (Wireless Op); Evans (Front Gunner) and A. Box (Rear Gunner), as part of a force of ten Wimpeys from Feltwell along with thirty-nine others from nearby bases.

The flight out was uneventful, with no interactions with either flak nor Luftwaffe night fighters. Over the target, bombs were released and several fires were seen to light, although German reports stated that little damage was done and no casualties were incurred.

The return leg took the formation over the Zuider Zee at which point the Wellington was strafed by canon fire from an Me 110 flying beneath it. As shells ripped though the fuselage, the rear gunner was injured in the foot but managed to return fire sending the attacker plummeting to Earth with heavy smoke pouring from the port engine.

Shortly after this, the Wellington’s wing, housing a fuel line damaged in the attack, itself caught fire and with the aircraft having a fabric covering, it was only a matter of time before it would also fall to Earth in a massive fireball.

With S/L Widdowson struggling to control the aircraft, which had had half its rudder shot away, its elevators severely damaged, hydraulics ruptured, flaps inoperable and bomb doors opened and damaged; a decision had to be made as to what to do next.

A bale out appeared to be the only safe and viable option. S/L. Widdowson gave the order and the crew began preparations to depart the stricken aircraft. Almost as a last minute attempt to save it, Widdowson instructed the crew to try and extinguish the fire, and they began ripping away the fabric covering the geodesic framework. Ward, grabbing a fire extinguisher, shot jets of agent through the hole toward the fire. At altitude and speed, the air stream was far too strong and the attempt had little effect on the burning engine.

At this point, and without attention to his own safety, Sgt. Ward decided to climb out and try to smother the fire with a canvas engine cover that had been used to raise S/L. Widdowson’s seat. Much to the dismay and protests of the other crewmen, Ward grabbed a parachute and attached a rope to himself and the Navigator, and began to climb out through the astrodome located between the wings in the fuselage’s ceiling. By punching holes in the aircraft’s fabric, he was able retain a foot and hand hold on to the aircraft, manoeuvring himself tight against the air frame toward the burning wing.

Once out onto the starboard wing, he approached the fire and pushed the canvas into the hole left by the flames. The fire burning furiously by now, was intense, and caused Sgt. Ward great pain forcing him to withdraw his hand several times before the slipstream finally caught the canvas tearing it from the hole and out into the dark night sky.

Being partially successful, there was little left for Sgt. Ward to do, so he began the arduous journey back toward the aircraft’s fuselage and its relative safety. By smothering the fire as he did, Ward’s attempts had made a difference, and shortly afterwards the fire extinguished itself enabling both the aircraft and crew to return to England safely making an emergency landing at RAF Newmarket Heath.

The Wellington with ‘hand-tholes’ after Sgt Ward tried to extinguish the fire.  (A) The hole caused by shell and, afterwards, by fire; (B) The Astro-Hatch through which Sergeant Ward, VC climbed; (1, 2 and 3) Holes kicked in the fabric by Sergeant Ward.(IWM CH3223)

Landing at 04:30, the Wellington came to a stop only after striking a fence on the airfield boundary, its brakes being totally unusable.

For his action, Sgt. James (Jimmy) Ward was awarded the Victoria Cross, the highest honour for bravery and extraordinary courage; he was the first New Zealander to win such an award during the Second World War. S/L. Widdowson for his actions, was awarded an immediate D.F.C. whilst Sgt. Box, the D.F.M.

At the time of the incident Sgt. Ward was only 22 years of age, he would be given his own crew and would go on to complete ten missions in total before, on the eleventh, being shot down and killed in another Wellington of 75 (NZ) Sqn over Hamburg on September 15th 1941.

Sgt Ward’s death brought a severe blow to the crews of 75 (NZ) Sqn, who perhaps thinking him invincible, went on to perform with great pride and determination in the face of great adversity. With over 8,000 sorties flown, the highest of any squadron in 3 Group, came a high cost, 193 aircraft being lost, the second highest of any Bomber Command Squadron of the Second World War.

Sgt Ward’s body was recovered from the crash that killed him, and along with his three comrades was laid to rest in the Ohlsdorf Cemetery in Hamburg, CWCG Plot 5A. A1. 9.

The report of Sgt. Ward’s VC. (Auckland Library Heritage Collection : 13 August 1941 : Item ref # AWNS 19410813-23-1)

Sgt. Ward’s citation appeared in the London Gazette “No. 35238” on 5 August 1941 p. 4515 and reads:

“On the night of 7th July, 1941, Sergeant Ward was second pilot of a Wellington returning from an attack on Munster.

When flying over the Zuider Zee at 13,000 feet, the aircraft was attacked from beneath by a Messerschmitt which secured hits with cannon shell and incendiary bullets. The rear gunner was wounded in the foot but delivered a burst of fire which sent the enemy fighter down, apparently out of control.

Fire then broke out near the starboard engine and, fed by petrol from a split pipe, quickly gained an alarming hold and threatened to spread to the entire wing. The crew forced a hole in the fuselage and made strenuous efforts to reduce the fire with extinguishers, and even the coffee in their vacuum flasks, but without success. They were then warned to be ready to abandon the aircraft.

As a last resort, Sergeant Ward volunteered to make an attempt to smother the fire with an engine cover which happened to be in use as a cushion. At first he proposed to discard his parachute, to reduce wind resistance, but was finally persuaded to take it. A rope from the dingy was tied to him, though this was of little help and might have become a danger had he been blown off the aircraft. With the help of the navigator, he then climbed through the narrow astro-hatch and put on his parachute. The bomber was flying at a reduced speed but the wind pressure must have been sufficient to render the operation one of extreme difficulty.

Breaking the fabric to make hand and foot holds where necessary, and also taking advantage of existing holes in the fabric, Sergeant Ward succeeded in descending three feet to the wing and proceeding another three feet to a position behind the engine, despite the slipstream from the airscrew which nearly blew him off the wing. Lying in this precarious position, he smothered the fire in the wing fabric and tried to push the cover into the hole in the wing and on to the leaking pipe from which the fire came. As soon as he removed his hand, however, the terrific wind blew the cover out and when he tried again it was lost. Tired as he was, he was able with the navigator’s assistance, to make successfully the perilous journey back into the aircraft.

There was now no danger of fire spreading from the petrol pipe, as there was no fabric left nearby, and in due course it burnt itself out. When the aircraft was nearly home some petrol which had collected in the wing blazed up furiously but died down quite suddenly. A safe landing was then made despite the damage sustained by the aircraft.

The flight home had been made possible by the gallant action of Sergeant Ward in extinguishing the fire on the wing in circumstances of the greatest difficulty and at the risk of his life.”

Sources.

National Archives – AIR 27/645/34, AIR 27/645/33

Auckland War Memorial Museum Website.

RAF Methwold -History was made, War was won and Lives were lost.

Whilst visiting the Swaffham (Norfolk) area, this was perhaps more prominent than in many of the other places I’d been. Like other sections, this area was predominately American in nature, forming the back bone of the USAAF, bomber squadrons of the 8th Air Force. An area rich in aviation history there are numerous tales of heroism and valour to be found. Our first stop along Trail 8 is RAF Methwold.

RAF Methwold

Methwold Village sign

Methwold village sign

Located between Downham Market and Thetford, Methwold is a small rural setting on the edge of Thetford Forest. Its village sign and combined memorial, remind the passer-by of its strong air force links – a Lockheed Ventura taking off over the village church.

Methwold was actually built as a satellite for nearby RAF Feltwell and as such, had few squadrons of its own. Being a satellite its runways were of grass construction with little in the way of luxuries for accommodation.

On the day war broke out in Europe, 214 Squadron, equipped with Wellington MKIs, moved from RAF Feltwell to here at Methwold. Feltwell being larger, offered a prime target for the Luftwaffe and so their loss would be Methwold’s gain. The first production Wellington, the MKI was powered by two 1,000 hp Bristol Pegasus XVIII radial engines, and would soon be updated and replaced by the MKIA; the main difference being a change in gun turret from the Vickers to the Nash & Thomson. As part of Bomber Command, 214 Sqn did not carry out its first operational bombing flight until June 1940 some four months after it had left Methwold; but that is not to say casualties were not suffered.

On Monday November 6th 1939, Wellington L4345, crashed whilst circling on approach to Methwold. The accident resulted in the deaths of both crewmen, Pilot Officer J. Lingwood and Aircraftman 1, – A. Matthews.

Tragic accidents were not uncommon in these early stages of the war, another similar incident occurring at Methwold only a month later. In mid December, Pilot Officers W. Colmer and R. Russell-Forbes, along with Leading Aircraftman J. Warriner, were all killed whilst on approach to the airfield flying in another Wellington, R2699. Both these Officers were only recently commissioned and were still considered relative flying ‘novices’.

In February 1940, 214 Sqn departed Methwold and transferred to RAF Stradishall leaving only a small number of Wellington IIIs of 57 Sqn detached from their parent station at Feltwell. These would, in September 1942, be replaced by the mighty Lancaster, the four engined bomber that formed the backbone of the RAF’s Bomber Command.

The Intelligence Room of No. 140 Wing, No. 2 Group, at Methwold, Norfolk. © IWM (HU 81315)

Little happened at Methwold for the next two years, then in October 1942, 21 Sqn arrived. After having flown many missions against coastal targets in the Mediterranean, they were disbanded at Luqa only to be reformed and re-equipped at Bodney the same day. After changing their Blenheims for Venturas in May 1942, they transferred to RAF Methwold where they stayed for six months.

Operating both the Ventura MKI and II, they were the first Bomber Command squadron to re-equip with the type, and were one of the small number of squadrons who took part in the famous Eindhoven raid, attacking the Philips radio factory in December 1942. The daring Operation Oyster, would see the loss of sixteen aircraft – three of which belonged to 21 Sqn. Two of these aircraft crashed in enemy territory, whilst the third ditched in the North Sea after having been hit by enemy gunfire. Using a mix of Venturas, Bostons and Mosquitoes, this mission perhaps revealed the true vulnerability of such aircraft over enemy territory, a warning that would violently repeat itself in the months to come.

The spring of 1943 would again see changes at Methwold; as 21 Sqn departed, the ‘Flying Dutchmen’ of 320 (Dutch) Sqn would move in. 320 Sqn, were formed after the German forces invaded the Netherlands and consisted of mainly Dutch nationals. They carried out both anti-shipping and rescue duties before transferring, from Leuchars, to Methwold via Bircham Newton. Upon arriving here, 320 Sqn was absorbed into No. 2 Group and would shortly swap their Hudson VIs for Mitchell IIs. After a very short transfer period, they then departed Methwold, moving to the much larger base at Attlebridge.

Two further squadrons of Venturas arrived at Methwold in the early spring of 1943. Both 464 (RAAF) and 487 (RNZAF) Sqns were formed, transferred and disbanded in unison, and both consisted of commonwealth crews. Having entered the war in a baptism of fire, they also flew alongside 21 Sqn on the Eindhoven raid; 464 Sqn contributing fourteen aircraft whilst 487 contributed sixteen – each squadron losing three aircraft and all but four of the twenty-four crewmen.

RAF Methwold

One of the original hangars at Methwold.

The Venturas earned themselves the unsavoury title the ‘flying pig‘ partly due to their appearance and partly due to poor performance. Based on the Lockheed Model 18 Lodestar, it was primarily a passenger aircraft and even though it had powerful engines, it performance was low and so operational losses were often high.

On May 3rd 1943, whilst on a ‘Ramrod‘ mission, eleven out of twelve (one returning due to engine trouble) 487 Sqn aircraft were lost to enemy action, and all but twelve of the forty-four crewmen were killed. Of these twelve, Squadron Leader Leonard H. Trent, was captured and taken to Stalag Luft III where he participated in the ‘Great Escape‘. On his eventual return to England at the end of the war, he was awarded the Victoria Cross for his leadership in ensuring the bomb run was completed despite heavy enemy resistance and very high losses.

In the summer of 1943, both 464 and 487 Squadrons became part of the newly formed Second Tactical Air Force; a move that led to their departure from Methwold, along with a new role and new aircraft.

Following their departure, Methwold was passed over to 3 Group and was designated to receive the heavy four-engined bombers of Bomber Command. To accommodate them, the site was upgraded to Class ‘A’ standard. Three runways were built, five hangars (four ‘T2s’ and one ‘B1’) were erected, and a wide range of ancillary buildings added. Aircraft dispersal consisted of 36 hard standings mainly of the spectacle type.

The incoming ground and aircrews would be accommodated in areas to the east of the airfield, buildings were sufficient for a small bomber site of some 1,800 men and just over 300 women, by no means large.

In this interim period on March 13th, a lone American P-47 #42-74727, suffered engine failure whilst on a routine training flight in the area. In an attempt to land at Methwold, the P-47 Thunderbolt crashed, slightly injuring the pilot but writing off the aircraft.

The first of the heavy bombers to arrive at the newly constructed Methwold were the mighty Stirling IIIs of 218 Sqn. A small detachment from RAF Woolfox Lodge, they would operate from here along side 149 Squadron who moved here from RAF Lakenheath in May 1944. 149’s record so far had been highly distinguished. Participating in the RAF’s second bombing mission of the war on September 4th, they had gone on to take part in the first 1,000 bomber raid, attacked prestige targets such as the Rhur, and had taken part in the Battle of Hamburg. They had also been in action in the skies over the Rocket development site at Peenemunde. They had gone on to drop essential supplies to the French Resistance, and one of its pilots, Flight Sergeant Rawdon Middleton, had won the VC for his valour and determination in action. 149 Sqn would go on with the offensive right up until the war’s end, replacing the ill-fated Stirlings with Lancaster MKIs and later the MKIIIs in August 1944.

During the D-Day landings, 149 Squadron were tasked with dropping dummy parachutists away from the Normandy beaches. As part of Operation Titanic, they were to deceive the German ground forces, aiming to draw them away from the Normandy beaches, thus reducing the defensive force. A task that proved relatively successful in certain areas of the invasion zone, it caused confusion in the German ranks and pulled vital men away from drop zones. During this dramatic operation, two 149 Sqn Stirlings were lost; LJ621 ‘OJ-M’ and LX385  ‘OJ-C’ – with all but three of the eighteen crew being killed.

In August 1944, 218 Sqn moved the remaining crews over to Methwold completing the unit’s strength once more. This move also led to them taking on the Lancaster MKIs and IIIs. 218 Sqn was another squadron with a remarkable record of achievements, its most notable being the VC posthumously awarded to Flight Sergeant Arthur Aaron for his ‘most conspicuous bravery’ whilst at RAF Downham Market.

As the allied advance moved across Europe, 149 Sqn supported them. In December 1944, 218 Sqn departed Methwold taking their Lancasters to RAF Chedburgh and disbandment the following year. 218’s losses were not over though, just days before the war’s end on April 24th 1945, Lancaster NF955 ‘HA-H’ crashed on take off, the last fatality of the squadron’s operational record. For 149 Sqn food packages replaced bombs as the relief operation – Operation Manna – took hold. After the fall of Germany in 1945, 149 Sqn ferried POWs back to Methwold in Operation Exodus, and for many, it was their first taste of freedom for many years.

The final squadron to be stationed at Methwold was 207 Squadron, between October 1945 and the end of April 1946 also flying the Lancaster I and III. As with many other bomber command squadrons, its history was also long and distinguished; flying its final mission of the war on 25th April 1945, against the SS Barracks at Berchtesgaden. During its wartime service 207 Sqn had completed some 540 operations, lost 154 crews and earned themselves a total of 7 DSOs, 115 DFCs and 92 DFMs.

In 1946, the Lancasters of 149 Squadron departed Methwold and all fell quiet. The site was officially closed in 1958 and the land returned to the former owners. In the early 1960s, much of the concrete was removed for hardcore, buildings were demolished and the land returned to agriculture, a state it primarily survives in today.

RAF Methwold

Stores huts used for light industry

Methwold airfield is located south of the village of Methwold, accessible by the B1112. As you drive along this road, the technical area is to your left and the main airfield to your right. The entire site is primarily agricultural, with some of the remaining buildings being used for farming purposes or light industry. Many of these are accessible or at least can be seen from the main public highway.

Large parts of the runways do still exist, although much of them are covered in newly developed industrial units, or are hidden away on private land. These most notable developments are at the northern end of the runway closest to Methwold village. However, best views of what’s left, are from the southern end, along a farm track that was once the perimeter track. Also here, is a single large and original ‘T2’ hangar, now used for storing agricultural equipment and other farm related products. This main north-westerly runway, built later in the war, is also used for farm related storage. Divided by a large fence, it is now part track and part storage. The remaining sections of perimeter track, a fraction of its original size, allows access to the runway past the hangar to an area of development further south to where the turret trainers once stood. Also visible here, is the Gymnasium built to drawing 16428/40 later adapted by the addition of a projection room (889/42) for recreational films.

Back alongside the B1112 hidden amongst the woods, is the technical area. Here in between the trees are the former technical huts and workshops now used by small industrial units, many of which survive in varying conditions, some of these are accessible to the general public.

RAF Methwold

One of the former runways looking north-west.

Methwold was never intended to be major player in the war. home to a small number of squadrons, it housed a variety of aircraft and a number of nationals who all combined, tell incredible stories of heroism, bravery and dedication. The squadrons who passed though here, carried out some of the RAF’s most daring raids, whether it be as part of a thousand bomber raid, a small force to attack the heart of Reich, or a diversionary raid to foil air and ground forces.

Methwold is now quiet, agriculture has taken over. The sound of heavy piston engines are now replaced by the sound of tractors, the buildings that once housed brave young men and their incredible machines now home to the machinery of food and farming. The small remnants of Methwold hold stories of their own, for it is here that history was made, war was won and lives were lost – and all in a very unassuming manner.

Notes and further reading 

Local information and further detail is available from the local Methwold history group. 

Methwold was originally visited in April 2013.

RAF Waterbeach – Birth of the Conversion Units (Part 1).

In Trail 11, we visit three airfields all within a stones throw of each other, and all situated around Britain’s third smallest city Ely, in Cambridgeshire. They were all once major airfields belonging to the RAF’s Bomber Command. Post war, two of the three went on to be major Cold War stations, one housing the Thor Missile, whilst the second housed the fast jets of the RAF’s front line of defence. It is this one we visit in the final part of this Trail. It is also one whose days are numbered, already closed and earmarked for development, the bulldozers are knocking at the door whilst the final plans are agreed and development can begin. But this development may not be the total clearing of the site it often is. With plans to integrate parts of this historical site into the development, it is aimed to create a living and working space that reflects it significant historical value. Today, in the final part of Trail 11, we visit the former station RAF Waterbeach.

RAF Waterbeach.

The land on which Waterbeach airfield stands has a history of its own, with royal connections going back as far as the 12th Century. Eventually divided up into farms, one of which, Winfold Farm, stood at the centre, the area would be developed into a long-term military base.

RAF Waterbeach would have a long career, one that extended well into the Cold War and beyond. It would be home to no less than twenty-two operational front line squadrons from both Bomber Command and Fighter Command, along with a further five Conversion Units. With only six of these units (3 front line and 3 Conversion Units) operating during the Second World War, the majority would be post-war squadrons, three being reformed here and eleven being disbanded here. This range of squadrons would bring with them a wide range of aircraft from Dakotas and Wellingtons through the four engined heavies the Stirling, Lancaster and B-24 Liberator, and onto the single and two seat jets, the Meteor, Hunter and Javelin, who would all grace the skies over this once famous airfield.

Originally identified as a possible site in the late 1930s, the land was purchased by the Government with development beginning in 1939. The farm at its centre was demolished and the surrounding fields dug up and prepared for the forthcoming heavy bombers of Bomber Command. As with many airfield developments, there was local opposition to the idea, partly as it occupied valuable Fen farmland with a farm at its centre.

In the early years of the war, it was found that heavy aircraft, bombers in particular, were struggling to use the grassed surfaces originally constructed on pre-war airfields. The rather ridiculous test of taxing a laden Whitley bomber across the site to test the ground’s strength would soon be obsolete, and so after much internal wrangling, hard runways were eventually agreed upon which would be built into all bomber and some fighter stations from that point forward*1.

As an airfield built at the end of the expansion period and into the beginning of the war, Waterbeach would be one of those stations whose runways were hard from the start; a concrete base covered with tarmac to the soon to be standard 2,000 and 1,400 yards in length. By the end of 1945, there would be 35 heavy bomber hardstands of the ‘frying pan’ style and a further three of the spectacle style, all supporting a wide range of aircraft types well into the cold war.

Waterbeach would develop into a major airfield, capable of housing in excess of 3,000 personnel of mixed rank and gender, dispersed as was now common, over seven sites to the south-eastern corner of the airfield. The bomb store was located well away to the north of the airfield, but surprisingly close to the main public road that passed alongside the western boundary of the site.

Being a bomber base, there would be a wide range of ancillary and support buildings, including initially, two J type hangars, followed by three T2s and a B1. The site was considered by its new occupants as ‘luxurious’ and compared to many other similar airfields of that time, it certainly was. This opinion was not formed however, when it opened on January 1st 1941, as it was in a state that was nowhere near completion. The official records show that along with Group Captain S. Park (Station Commander) were the Sqn. Ldr. for Admin  (Sqn. Ldr. F Carpenter), Station Adjutant (Flt. Lt. H. Daves) and Sqn. Ldr. J. Kains (Senior Medical Officer) who were joined  by various other administrative officers, Senior NCOs and 157 corporals and Airmen. They found the majority of buildings incomplete, the runways and dispersals still being built and the site generally very muddy. The cook house was ‘adequate’ for the needs of the few who were there, but the sergeants mess could not be occupied for at least another five to six weeks.

RAF Waterbeach 'J' Hangar

A ‘J’ Hangar seen from the public road at Waterbeach.

As occurred with many airfields at this time, the first personnel to arrive took up the task of completing many aspects of the outstanding work themselves, laying concrete, installing fixings and preparing accommodation blocks for the forthcoming arrivals.

During these early years of the Second World War, the Luftwaffe targeted Britain’s Fighter airfields as a way of smashing the RAF before the German planned invasion could take place. Whilst this policy failed, attacks on RAF airfields were continued, becoming more ‘nuisance’ attacks or small raids, in which airfields beyond the reaches of Kent and London were also targeted. Waterbeach itself was subjected to these nuisance attacks on two occasions between the New Year December 1940 and February 1941. During these, some minor damage was done to the site (hangars, aprons and a runway) and there was one fatality.

These early days of 1941 would be a busy time for the personnel at Waterbeach, further attacks intermixed with flying activities kept them alert and on their feet. Being a large base, its runways would become safe havens for crippled or lost aircraft desperately trying to find a suitable site on which to put down. A number of aircraft used Waterbeach for such an activity, primarily Whitleys and Wellingtons, many being damaged and unable to reach their home bases further north in Yorkshire.

With changes in airfield command taking place a month after its opening, the first units to arrive were the Wellingtons of No. 99 Squadron RAF, in a move that was delayed by a further month in part due to the late completion of the construction work and also because of yet another nuisance attack by the Luftwaffe.

Whilst 99 Sqn were preparing to transfer to Waterbeach, operations would continue from their base at Newmarket Heath, bombing raids that took the Wellingtons to Breman, Gelsenkirchen, Dusseldorf, Duisburg and Cologne.

Once arriving here at Waterbeach, they found early missions, on both the 1st and 2nd of April 1941, being cancelled due to poor weather – training would therefore be the order of the day. The 3rd however, would be very different.  With revised orders coming through in the morning, thirteen aircraft would be required to attack the Battle cruisers Scharnhorst and Gneisenau located in Brest harbour.

Whilst one of the aircraft allocated was forced to land at RAF St Eval in Cornwall due to icing, the remainder flew on completing the raid which was considered a “great success”. One crew, led by P/O. Dixon, carried out particularly daring diving attacks scoring direct hits on one of the two ships in question. Whilst no other hits were recorded by the Wellingtons, many bombs fell very close to the targets and it was thought some may have even struck one of the two ships.

With the squadron being stood down on the 5th April, there would be a return to flying on the 6th, with ten aircraft being allocated to a maximum effort mission returning to Brest and the two German ships. Taking off at 20:17, ten aircraft flew directly to the harbour and carried out their attacks, whilst a ‘freshman’ crew flew a diversionary mission elsewhere. Although all but one aircraft returned safely to base, one aircraft did have problems when its 4,000lb bomb fell off the mounts prematurely.

Flying the MK.I, MK.IC and MK.II Wellington, 99 Sqn would carry out further operations to Germany, and on one of these sorties on the night of April 9th/10th, eight aircraft were assigned to Berlin, two to Breman and a further two to Emden. One Wellington, R1440, piloted by P/O. Thomas Fairhurst (s/n 85673) crashed in the Ijsselmer near Vegesack, whilst the second, R3199 disappeared without trace after making a distress call. On the 30th, the Air Ministry informed Waterbeach that POW cards had been received from a German prison camp from four of the crew: S/L. D. Torrens, P/O. P. Goodwin, Sgt. A. Smith and Sgt. E. Berry. The remaining two crewmen were also taken prisoner but this was not confirmed until much later.

April was a difficult month for 99 Sqn, operations called for in the morning were often cancelled by the evening, those that went ahead were made more difficult by poor weather over the target area. Two positive events occurring during April did bring good news to the crews however. On the 15th, the King approved an award of the DFC to P/O. Michael Dixon (s/n: 86390) for his action in attacking the Scharnhorst and Gneisenau earlier on, and on the 22nd, the Inspector General of the RAF Air Chief Marshal Sir Edgar Ludlow-Hewitt visited the station where he inspected various sections of the squadron, met the crews and discussed some of their recent operations with them. A nice end to what had been a difficult start at Waterbeach.

Air Chief Marshal Sir Edgar Ludlow-Hewitt, Air Officer Commanding-in-Chief Bomber Command, sitting in his office at Headquarters Bomber Command, High Wycombe. © IWM (C 1013)

Throughout the summer months 99 Sqn would continue operations into Germany along with further attacks on the Scharnhorst and Gneisenau docked at Brest. With further loses on May 5/6, May 8/9, June 11/12 , and June 21st with the loss of X9643 two miles from the airfield, losses would be relatively low. In a freak accident X9643 would be lost with all of her crew when the dingy became dislodged and fouled the elevators causing the aircraft to crash and burst in to flames.

Corporal C. P. Eva

Corporal C. P. Eva, killed 21st June 1941 when the dingy in his aircraft fouled the elevators.

The latter months of 1941 would see two conversion flights formed at Waterbeach. Designed to train crews on the new four engined bombers, the Stirling and latterly the Lancaster, 26 Conversion Flight was formed out of ‘C’ flight of 7 Sqn on 5th October with 106 Conversion Flight joining them in December. Both units flew the Stirling bomber and were amalgamated in January 1942 to form 1651 Conversion Unit (CU) (later 1651 Heavy Conversion Unit (HCU)). Flying a mix of Stirlings and later Lancasters, they also used a Beaufighter, Spitfire, Tiger Moth and Airspeed Oxford. 1651 CU were one of only three Conversion Units set up in early 1942, with 1651 being the only Stirling unit at this point; the other two units flying with the Halifax or Liberator aircraft.

By the end of 1941, 99 Sqn would suffer thirty-four aircraft lost (2 in non-operational accidents), with many of the crewmen being killed. Whilst these were tragic losses, they were nevertheless ‘in line’ with the majority of all 3 Group operational units of that year. In early 1942 the squadron was sent overseas to India, a move that coincided with the new arrivals at RAF Waterbeach of No. 215 Sqn.

215 Sqn were going through a process of reorganisation and transfer. On 21st February 1942, the air echelon formed at Waterbeach whilst the ground echelons were already on route to India from Stradishall. With more Wellington ICs, they would also depart for India a month later, where they would stay for the remainder of the war. Being only a brief stay, their departure left Waterbeach with only 1651 Conversion Unit and its associated units in situ.

Being a conversion unit, 1651’s aircraft were worn and often unserviceable, and in February 1942, they could only muster five flight worthy aircraft. As the need for more bomber crews grew, so too did the number of aircraft supplied to the Conversion Units, and as a result the number of crews undertaking training also grew. To help meet this demand, another new squadron was formed within 1651 CU in the April, that of 214 Squadron Conversion Flight. Another Flight was also formed at Alconbury and moved to join these two units, No. 15 Squadron Conversion Flight. The idea behind this unit was to provide aircrews with operational experience, an experience many would find hard to deal with.

In Part 2 we see how the Conversion Units were sent into battle, how they coped with the rigours of the aerial war over occupied Europe and then the change from Stirlings to the Lancaster.


September 8th 1943 – Tragedy at RAF Mepal.

On the night of September 8/9th 1943,  a force of 257 aircraft comprising 119 Wellingtons, 112 Stirlings, 16 Mosquitoes and 10 Halifaxes took off from various bases around the U.K. to bomb the Nazi gun positions at Boulogne. Included in this force were aircraft from the RAF’s Operational Training Units, and for the first time of the war, five B-17s flown by US aircrews of the USAAF’s 422nd BS, 305th BG at Grafton Underwood. This was the first of eight such missions to test the feasibility of the USAAF carrying out night operations over Europe.  After the remaining seven missions, in which the squadron had dropped 68 tons of bombs, the idea was scrapped, the concept considered ‘uneconomical’ although the aircraft themselves proved to be more than capable of the operations.

The Gun battery targeted, was the emplacement that housed the Germans’ long-range guns, and the target wold be marked by Oboe Mosquitoes. With good weather and clear visibility, navigation was excellent, allowing the main force to successfully drop their bombs in the target area causing several huge explosions. However, not many fires were seen burning and the mission was not recorded as a success. Reports subsequently showed that the emplacement was undamaged due to both inaccurate marking by Pathfinders, and bombing by the main force. However, as both anti-aircraft fire and night fighter activity were light, no aircraft were lost during the flight making it a rather an uneventful night.

However, the mission was not all plain sailing, and whilst all crews returned, the night was marred by some very tragic events.

Three Stirlings were to take off from their various bases that night: at 21:00 hrs from Chedburgh, Stirling MK. III, EF136, piloted by F/S. R. Bunce of 620 Sqn; at 21:30, another Stirling MK.III, from 75 Sqn at RAF Mepal, BK809 ‘JN-T*1‘ piloted by F/O I.R.Menzies of the RNZAF; and lastly at 21:58 also from Chedburgh, Stirling MK. I, R9288 ‘BU-Q’ piloted by N.J. Tutt  of 214 Sqn.  Unfortunately all three aircraft were to suffer the same and uncanny fate, swinging violently on take off. The first EF136 crashed almost immediately, the second BK809 struck a fuel bowser, and the third R9288 ended up in the bomb dump. Miraculously in both the Chedburgh incidents there were no casualties at all, all fourteen crew men surviving what must have been one of their luckiest escapes of the war! The same cannot be said for the second though.

Stirling BK809 was part of a seventeen strong force of 75 Sqn aircraft. Each aircraft was carrying its full load made up of 1,000lb and 500lb bombs. As the Stirling was running along the runway, it swung violently, striking a fuel bowser which sent it careering into houses bordering the edge of the airfield.

One of the occupants of one of the houses, Mr. P. Smith, saw the aircraft approaching and ran into the street to warn others to get clear. As the aircraft struck the rear of the houses, it burst into flames causing some of the bombs to detonate. This brought considerable rubble down on the occupants of the second house, Mr and Mrs John Randall.

Mrs Randall managed to get out, her legs injured, whereupon she was met by a local fireman, Mr. A.E. Kirby of the National Fire Service. Mr. Kirby went on to help search in the wreckage of the house until his attempts were thwarted by another explosion. His body, along with that of Mr. Randall, was found the next day.

Two other people were also killed that night trying to provide assistance, those being F/Sgt Peter Gerald Dobson, RNZAF and Section Officer Joan Marjorie Easton WAAF. F/Sgt. Dobson was later mentioned in despatches. Three members of the crew lost their lives as a result of the accident, F/O. Menzies and F/O. N. Gale both died in the actual crash whilst Sgt. A. Mellor died later from injuries sustained in the accident.

A number of others were injured in the crash and one further member of the squadron, Cpl Terence Henry King B.E.M, was awarded the British Empire Medal “for his bravery that night in giving assistance“.

The mission on the night of September 8/9th 1943 will not go down as one of the most remarkable, even though  it was unique in many respects, but it will be remembered for the sad loss of crews, serving officers and civilians alike in what was a very tragic and sad event.

The crew of Stirling BK809 were:

F/O. Ian Robert Menzies RNZAF NZ415002. (Pilot).
P/O. Derek Albert Arthur Cordery RAFVR 136360. (Nav).
P/O. Norman Hathway Gale RAFVR 849986. (B/A).
Sgt. Ralph Herbert Barker RNZAF NZ417189. (W/O).
Sgt. Albert Leslie Mellor RAFVR 943914. (Flt. Eng).
Sgt. Bullivant G RAFVR 1395379. (Upp. G)
Sgt. Stewart Donald Muir RNZAF NZ416967. (R/G).

RAF Mepal was visited in Trail 11.

Sources and Further Reading.

*1 Chorley, 1996 “Bomber Command Losses 1943” notes this aircraft as AA-T.

Chorley, W.R., “Bomber Command Losses – 1943“, Midland Counties, (1996)

Middlebrook M., & Everitt C., “The Bomber Command War Diaries”  Midland Publishing, (1996)

Further details of this accident, the crews and those involved can be found on the 75 (NZ) Sqn blog. This includes the gravestones of those killed and a newspaper report of the event.

My thanks also go to Neil Bright (Twitter handle @Blitz_Detective) for the initial  information.

RAF Milfield – Arguably One of Britain’s Most Significant Airfields.

High up in the northern most reaches of England is an airfield that has repeatedly appeared in the memoirs of many RAF and USAAF pilots. Not because it was a busy front-line station dealing with the constant battle against marauding enemy bombers, but more simply because it was a training station. However, this airfield was no ordinary training facility. It operated a large number of aircraft whose pilots played a major part in both the Normandy landings and the drive on through France and the low countries. In this, the next trail, we visit Northumberland, and a place where ground attack pilots honed their skills, perfecting the use of rockets, canon and bombs, in the destruction of enemy troop convoys, trains and tanks. The first stop on this trail is an airfield that is arguably one of Britain’s most significant airfields – RAF Milfield.

RAF Milfield.

RAF Milfield lies a short distance from the village it takes its name from, at the foot of the Cheviot hills on an area known as the Millfield Plain. It is an area steeped in history. On this site, evidence has been found of Neolithic hearths, storage pits and post holes.  There is also evidence of two Bronze Age circular houses and a further three rectangular houses dating back to the ‘Dark Age’; an age that probably pre-dates the Anglo-Saxon conquest of the area from around AD 547.

This area was also the scene of many fierce and brutal battles between the English and the Scots, The Battle of Homildon Hill and the Battle of Flodden were both fought within a few miles of this very site. In both these conflicts, heavy casualties were suffered by both sides, and it is therefore, an area that is both used to war, and one that is rich in historical interest.

RAF Milfield

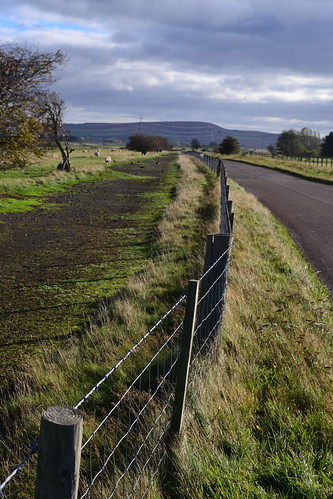
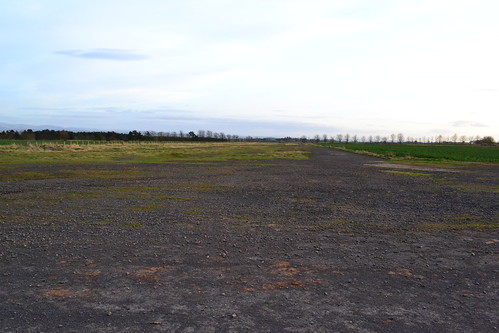
The Perimeter track is now the public road, parts lay visible alongside with associated dispersal pans.

As a military aviation site, Milfield came into being during the First World War. One of several such sites in the region that was used as little more than an emergency landing ground by 77 Squadron who were based further north at Edinburgh. Known at the time as Woodbridge, it would be a quiet little site that would soon disappear, quickly returning to its agricultural roots once war was over.

As a second war with Germany seemed inevitable, the need for new airfields became evermore apparent, and so the Air Ministry implemented the airfield expansion scheme. This programme developed so quickly that by 1942 there was a front line airfield opening at the rate of one every three days! As the German forces moved ever more quickly, and the Fall of France led to the Battle of Britain, the need for fresh, well-trained pilots became paramount. With home reserves drying up, the Commonwealth became an untapped source that would fill the ever-increasing void that was becoming a thorn in the side of the RAF.

Trained only in basic flying techniques, these crews had to be battle hardened and fit for action in a matter of weeks or even less. Initial training operations were mere ‘lip-service’ and recruits often had as much chance of killing themselves as they did the enemy they were intended to down. To meet this demand, numerous training stations were created, manned mainly by Operational Training Units (OTU), they were governed by the various arms of the Air Command: Fighter, Bomber, Naval, Transport etc.

At these training sites, crews would in essence, perform a ‘post-graduate’ training exercise, where they would be assembled for the first time and trained in their respective roles on the aircraft they would be expected to fly operationally. Milfield would be designated as one such station, and was initially identified as a suitable location for a bomber command site. Following requisition of the land in early 1941, the green-light for development was given, the process was put into place, and RAF Milfield was born.

Before any bomber crew would use Milfield though, it would pass from Bomber Command control over to Fighter Command whose focus would now be fighter pilots, and in particular, those specialising in both ground attack and dive bombing techniques.

As pilots came from all across the world, their training standards were some what disjointed, and so a refresher course bringing all crews up to the same standard would be required. This was a role that Milfield would fulfil. Working in conjunction with its satellite station a  few miles to the east, RAF Brunton, Milfield crews would spend some 9 to 10 weeks in total on flying techniques, both solo and formation flying, with the more advanced training taking place at RAF Brunton.

Nestled between the main road and the River Till, Milfield would be built to bomber station specifications, the three runways being wood chip and concrete one of 1,400 yards and two of 1,100 Yards. During development and subsequent handover to Fighter Command though, the new Class ‘A’ airfield standard would come in to being, requiring all airfields to be built with a longer runway specification. However, being a fighter training site, these were not imposed and whilst two of the runways were extended (1,800 and 1,300 yards) they were not to the full Class A specification.

RAF Milfield

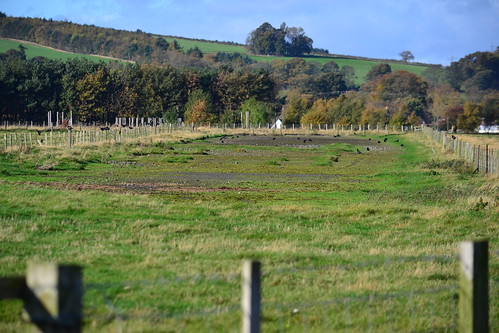
The runway threshold is still surviving, note the close proximity of the hills in the background.

As a training airfield it would be exceptionally busy. An expected turnover would be a new course starting around every 3 weeks, which would mean a considerable number of aircrew and aircraft; in excess of 100 air frames would be located here at Milfield at any one time. The primary fighter aircraft at this point would be the Hurricane with other examples including the Miles Master and Magister. To repair and maintain the aircraft, two T2 hangars were constructed with a further eight blister hangars located around the dispersal areas. Squadron dispersal huts were spread around the perimeter, with the technical area and main hangars being located to the south-eastern side. Accommodation, designed to be temporary, was dispersed over 13 sites, and would be designed to accommodate in the region of 1,650 staff, both male and female. Like many airfields though, this figure was surpassed with the actual ‘on roll’ totals varying considerably reflecting the constant movement of staff. Including the numerous support staff, it is believed that some 3,300 people were employed at Milfield at its height.

Adjacent to the airfield was the former Galewood Farm House, an old farm building used as an Officer’s mess during the airfield’s operational life. Destroyed in the 1960s, it was once part of an estate that adjoined the airfield, and was previously home to Josephine Butler. Josephine was the leader of a national women’s political campaign in Victorian England, who campaigned on behalf of prostitutes, abused and trafficked women until her death in 1906*1. Now commandeered by the military, a snooker table with lights powered by a generator was placed inside, and nearby stood the NAAFI theatre, the recreational building showing the usual films to keep the personnel entertained.

It was during this construction period that the first enemy action would occur over Milfield. On September 1st 1941, at 23:00 hrs, six bombs were dropped in the vicinity of Milfield. A crater 72 feet wide and 10 feet deep was recorded, the road was blocked and telephone lines were brought down. Also during this time, and whilst not officially open, aircraft would land at Millfield, presumably as test landings or after getting into difficulty. One of the first casualties here was that of Sgt. James B Spangler (R71573) RCAF flying Hurricane V7044 on 25th June 1941, who was “killed in the course of a training flight” whilst flying with 59 OTU. This tragic accident would be a sign of things to come.

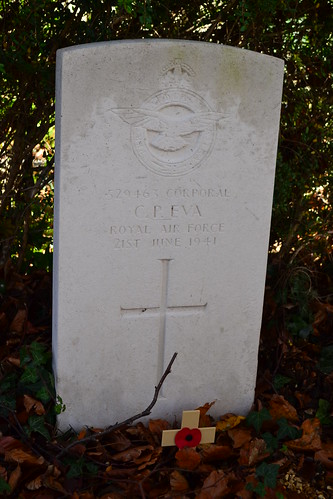
Because of the nature of training flights, accidental deaths on or around Milfield would become fairly common. These included on October 6th, 1941, Hurricane MK. I W9177 which was forced to Bellyland in a field near to Stocksfield just west of Newcastle-upon-Tyne. On 13th December 1941, Sgt. Norman Clunie Pow, (R83911) RCAF, again of 59 OTU, crashed in Hurricane P3809. Sgt. Pow was just 25 years of age and was buried some several hundred miles away next to RAF Sutton Bridge in Lincolnshire, another training station.

Sutton Bridge Churchyard

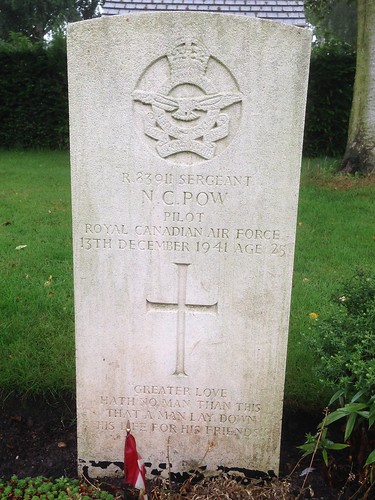
Sgt. Pow’s grave at Sutton Bridge.

As a training airfield, no operational front line squadrons would use Milfield, other than a detachment of 184 Sqn Hurricane IIDs between 1st December, 1942 and 1st March, 1943. The only other use of Milfield by ‘front line’ units would be as a transit base in the early post-war months.

The first full unit to arrive was that of 59 Operational Training Unit (OTU), arriving in the August of 1942.

59 OTU were originally formed at Turnhouse in December 1940, and operated amongst other things, the Hurricane, the Magister, the Fairy Battle and finally Hawker’s Tempest, all in a training capacity. After spending some five months at Crosby-on-Eden, the unit transferred to Milfield where they trained pilots in the ground attack role. As with many training stations, casualties were high, with many accidents happening through either pilot error or mechanical defects. Many of the Hurricanes used here were veterans themselves, beaten and patched up following intensive fighting in the Battle of Britain, many were long past their sell by date.

One of the first accidents to occur was that of Sgt. K. Dole, RCAF, who stalled whilst performing aerobatics – either authorised or not. His aircraft, a Hurricane MK.I ‘V7316’, MF 89 of ‘Z’ flight 59 OTU, crashed on farmland near Cornhill in August 1942. Luckily Sgt. Dole was unhurt, and the aircraft was salvaged; being repaired and sent to operations in the Middle East. The same fate however, did not fall to P/O J. Methum, who was killed in early September 1942, when his Hurricane MK.I ‘V6840’ crashed in a forced landing a few miles away to the east. The aircraft was written off in this most tragic of accidents.

The dangers of training became evermore apparent over the next few months, Saturday 27th March 1943 being particularly poor for 59 OTU with two crashes on the same day.  Hurricanes Mk.I ‘W9184’ and ‘W9121’ crashing in forced landings and night landings respectively. Both pilots were killed that day; Sgt. Robert MacFadzean (s/n: 1349862) born of US resident parents, and Welshman, Sgt. Gordon Cullener (s/n: 1383311).

Four months after 59 OTU’s arrival, No 1 Specialised Low Attack Instructors School  (SLAIS) would also be formed here (7th December, 1942) another unit that used the Hurricane and the Magister. One of the Chief Instructors of the School would be Squadron Leader J.H. “Ginger” Lacey DFM and Bar, a Battle of Britain Veteran who ended his career with 28 confirmed kills.

Hurricane MK.IID of No. 1 Specialised Low Attack Instructors School being refuelled and rearmed by Ground crew, including a WAAF, on a wet dispersal at Milfield. The fairings covering the two Vickers 40mm anti-tank guns beneath the wings have been removed and a warning notice hung from the barrel. (IWM CH 18134)

Low flying, in even in the relative safety of Northern England, was not immune from accidents, mishaps or misjudgements by the pilots. On 21st February 1943, Hurricane MK.II ‘HW731’ of the SLAIS hit an obstacle one mile north of Beal, the pilot escaped unharmed and after nursing the aircraft back to Milfield, it was repaired and converted for ground training purposes as ‘4616M’.

As flying training continued, so too did the number of accidents, burst tyres, engine malfunctions and fires, pilot error and collisions accounting for a wide range of them. On April 27th 1943, two Hurricanes collided in mid-air whilst performing formation flying. Both airmen, F/Sgt Davies and F/O Thompson were killed; an event that was mirrored in the following July when Hurricanes ‘P3475’ and ‘V7173’ also collided again with fatal results. New Zealander Charles Humphrey (s/n: 421056) is buried locally.

On May 1st 1943, 59 OTU transferred from 81 Group to No. 9 Group, at which point 81 Group was disbanded. No 9. took over 81’s responsibility, and it remained primarily a training arm of the Royal Air Force. For 59 OTU though, little would change.

On September 16th 1943, a B-17F-BO  (42-30030) named ‘Old Ironsides‘ ran out of fuel whilst returning from La Rochelle. The pilot Lieutenant Henry J Nagorka, decided to ditch in the sea near Farne Islands, off the Northumbrian coast. The aircraft quickly filled with water and in under four minutes she had disappeared beneath the waves.

During the ditching two crewmen were lost, waist gunners: S/Sgt. Ed Christensen and S/Sgt. Claude Whitehead, whilst the tail gunner S/Sgt. Harris lost a leg. Those that survived managed to climb into a dingy and sailed to St Cuthbert’s Island where they awaited rescue. Upon being saved, they were transferred to Milfield, where they were collected by another B-17 from the USAAF. However, as Milfield was a fighter airfield and its runways hadn’t been extended to Class A specifications, there were doubts about the aircraft’s ability to get off the ground on the short space available. To overcome the problem, the hedges at the end of the runway were removed and steal planking temporarily laid, the problem never arose though as the B-17 along with its additional human cargo left Milfield safely.

B-17F ‘Old Ironsides’ 42-30030, was lost at sea on the 16th September 1943 with the loss of two men. (IWM UPL 28296)

On January 26th 1944, both 59 OTU and the SLAIS were disbanded and a new unit formed, the Fighter Leaders School (FLS). The School had its origins in 52 OTU formed at Chedworth, and was in January, created as a unit in its own right. Formed through the need for more ground attack pilots in preparation for the forthcoming invasion, it was a unit that would take on the responsibility for the majority of the RAF’s ground attack crews. One notable figure of the FLS at Milfield was Bob Doe DSO, DFC & Bar, another veteran of the Battle of Britain. He would later return to operational duties after his short stay here in Northumberland.

Using the codes HK, OQ and MF, the FLS operated a number of aircraft predominately Spitfire VBs, and Spitfire MK IXs along with a handful of other marks. It later went on to adopt the Sabre engined Typhoon IB. In total over 130 aircraft would be used by the  Milfield unit, an incredible amount of aircraft on one site at any one time. Milfield continued to be in the spotlight.

It was also during this time, early 1944, that the USAAF would begin to send their pilots to Milfield to train on their ranges. With them, came a variety of US built aircraft, P-38 ‘Lightnings’, P-47 ‘Thunderbolts’ and the P-51 ‘Mustangs’. The brainchild of General Quesada, the plan was to train Ninth Air Force pilots in the art of dive bombing, skip bombing and low-level attacks, techniques that would become paramount if the push through France and on into Germany was to succeed. The arrival and increased use of Milfield by the US crews gave an indication that the impending invasion was drawing ever closer.

One of the earliest accidents for the FLS was in March of 1944, when Mohawk MK.III AR633 of 510 Squadron was hit by a Typhoon (JR509) of the Fighter Leader School on take off. Also on this day, a Spitfire MK.IIa (P8549) of the FLS tragically blew up in mid-air during a dive bombing attack on the Goswick ranges. The pilot of the Spitfire, F/Lt. Bouquen, a Belgian, was killed in the incident.

About a month later, a flight of four P47D Thunderbolts from the 366th FS (358th FG) from RAF Raydon attached to Milfield, were carrying out practice strafing attacks on a military convoy. During the climb out of the attack, one of the Thunderbolts (42-25530), piloted by 1st Lt A. Serapiglia collided head on with Spitfire Mk 1 ‘R6762’ which was preparing to land at nearby RAF Eshott. In the collision, both pilots Sgt. Kai Knajenhjelm a 19-year-old Norwegian and Lt. Serapiglia were killed. After the investigation it was deemed that all future exercises should be performed “outside of local flying areas” of nearby airfields, something that perhaps seems obvious today, but reflects the hectic and often frantic skies over northern England in the 1940s.

A further accident to befall the Americans occurred on May 27th 1944, when a P-38 ‘Lightning’ #42-67425, of the 392nd FS, 367th FG piloted by Dueron H. Robertson, of the Ninth Air force, suffered a landing accident. The aircraft suffered major damage in the crash.

One of the benefits of attending the FLS was the diverse range not only of nationalities: Dutch, Czech, Canadian, Australian, New Zealand and South Africans to name but a few, but also the range of aircraft used. At the end of courses, trainees – now fully fledged fight pilots – were sometimes given the opportunity to try out other types of aircraft. An action that no doubt put the fear of God into the Station Commander who was heard to have shut his door and say “to hell with it”*2 . A number of other incidents occurred during this hectic time, which saw, by the end of December 1944, the FLS being absorbed into the Central Fighter Establishment based at RAF Wittering. Following this, the staff at Milfield all moved out, and momentarily peace prevailed once more.

Between mid December 1944 and into early January 1945, 56 OTU was reformed. Previously at RAF Sutton Bridge in Lincolnshire, it brought new aircraft, to the area, and Northumbria now reverberated to the radial engines of the Typhoon IB and the Tempest V; as four squadrons operated the aircraft using the codes FE, GF, HQ and OD. A collection of other aircraft types also graced the skies of this now highly significant airfield, Spitfires, Tiger Moths, Leopard Moths and Magisters to name but a few.

Even though the war in Europe was winding its way toward its conclusive ending, priority for aircraft was given to this purposefully created unit, and practice flights continued in earnest. The skies remained busy and accident numbers remained high.  In the space of one month between mid January and mid February 1945, there were no less than 8 incidents involving aircraft from Milfield and 56 OTU. As with many incidents here, poor weather, engine failures and pilot error were the causes of many  aircraft abandonment, pilot injuries and tragically deaths. In these eight incidents six involved Typhoons and two involved Tempests.

RAF Milfield

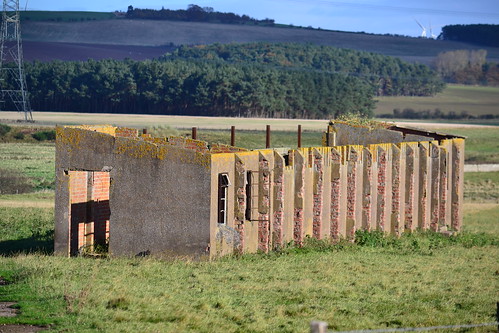
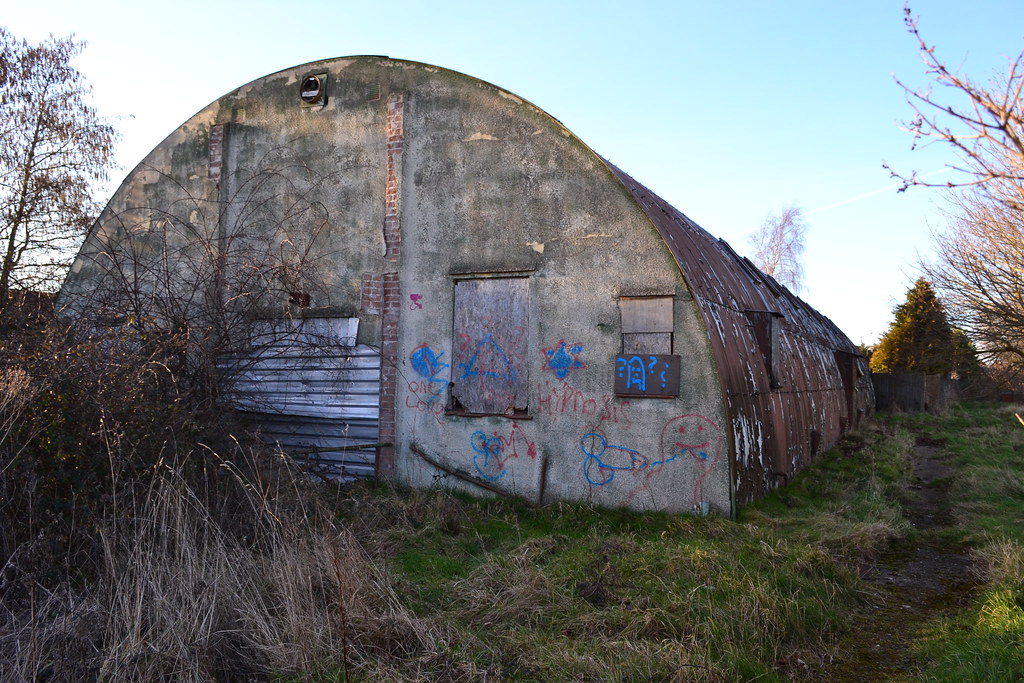
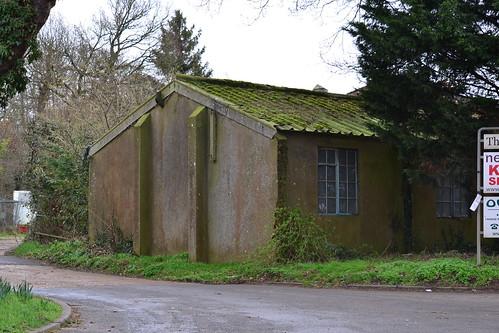
MG & Cannon Range building, one of the few remaining structures at Milfield.

March and April were similar stories, accidents, mishaps and deaths continued to plague Milfield, with pilot error accounting for a larger number of the accidents. Perhaps one of the most bizarre incidents took place on March 8th 1945 when the leader of a Spitfire squadron ‘deliberately’ attacked a Typhoon Mk.Ib ‘MP187’ of 56 OTU, killing the pilot F/O. R Smith of the Royal Canadian Air Force. The Typhoon was commonly mistaken for the Luftwaffe’s Focke Wolf 190, a formidable beast that became the scourge of the USAAF bomber formations.

The closing stages of the war didn’t bring a respite either. Saturday 12th May saw a collision between Tempests ‘EJ685’ and ‘NV759’ an event that killed an instructor pilot. Even after the war’s end, accidents continued to occur, with June, July, August and September all witnessing  further deaths and incidents. August 23rd saw Typhoon ‘SW638’ collide on the ground with two other aircraft, both those struck were written off whilst the ‘offending’ aircraft was badly damaged.

At the end of the war, and over just a two-day period, the only two operational units to use Milfield would arrive, using it as a transit stop. Both 164 Squadron and 183 Squadron would arrive and depart on the same day 16 – 17th June 1945 bringing with them yet more Typhoons.

Eventually, nearly nine months after the war’s end, on February 14th 1946, 56 OTU were disbanded, but not before one final roll of the dice when the life of an RAF pilot was taken. On January 29th 1946, whilst on a “Camera Exercise” and after performing a slow roll ten miles west of Holy Island, Tempest Mk. V EJ859 piloted by F/Lt. Vincent Parker (s/n 42356) RAFVR, an Australian aged 27, dived into the ground killing him. In a cruel twist of irony, F/Lt Parker was killed after having survived as a prisoner of war since 16th August 1940. He had remained in a German POW camp until its liberation at the end of hostilities, returning to England in June 1945, his post-war, peacetime life had been shorter than his life in captivity.

The departure of 56 OTU signified the end of the RAF’s interests in Milfield, and although not a front line operational airfield, it had become a very active and played a highly significant role in fighter training and development. Used to train both new and experienced pilots, it had become one of the RAF’s top fighter pilot training stations, developing pilot’s proficiency in low-level weapons delivery techniques. No matter how dangerous the training got, crews had continued to pass through, morale had  remained high and the standards were never dropped. Of the 1,200 pilots who had passed through here, many went on to make their names as the top ground attack pilots of the Second World War.

Immediately after the war, many of the accommodation huts were used to house Latvian soldiers, many staying here up until 1950. Local people were then housed in refurbished WAAF blocks before moving on to more permanent housing in the local village.

Soon after, Milfield began its decline with many of the buildings being demolished over the coming years. During the cold war era, the two T2 hangars were designated storage units for dried foods and emergency rations, thankfully a role that never had to be called into operation.  Eventually the runways were dug up and removed for hardcore, quarrying took over the southern end of the airfield and much of the surface layers were removed in the process.

During the 1970s investigations were carried by Air Anglia into the possibility of commencing commuter flights to European cities, but the project failed to ‘get off the ground’ and the service was scrapped before it ever developed into anything more than investigative flights.

Now partly returning to agriculture, a small section of the airfield has been retained by the Borders Glider Club*3 . The battle to keep gliders and flying here alive, being a long and difficult one. Through this small organisation, that operates only at the weekends, the spirit of flying lives on, and Milfield continues to fight for survival, a fight that has been both emotive and historically significant in the battle for the skies over Britain. The T2s have now gone as has virtually all the remaining buildings. A stone statue built by an Italian POW who was employed on the local farm, stands on private land, marking what was the official entrance to the airfield during the war years, it is clearly visible from the road side.

RAF Milfield

One of two sculptures, one made by an Italian POW, the second copied by an RAF serviceman.

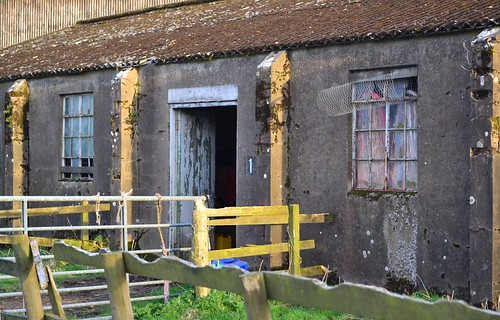
Located four miles north-west of Wooler and Visiting today, there is little evidence of the former airfield left. Small sections of the perimeter track are now the public road, but alongside the road,  the remainder of the track can just still be seen. The north-western end of the runway is also visible as are a small collection of dispersal pans.  The MG & Cannon Range building still stands, minus its roof it is rapidly decaying, it has a very short life left.

Interestingly, as a training airfield, Milfield used both a Fisher Front Turret Trainer and Hawarden Trainer, a simulation trainer that used the fuselage of a Spitfire to train pilots in interception techniques. A model suspended from the ceiling up to 60 feet away from the pilot could be moved forwards or backwards by operating the opposite movement of the Spitfire’s throttle. As the Spitfire ‘accelerated’ the model moved backwards along a rail, rather similar in design to a 1970’s child’s toy. During these sessions a range of flying skills could be tested, interception and aircraft recognition, throttle control and cockpit procedures included. A primitive method that was state of the art in 1941. Sadly neither of these exist today.

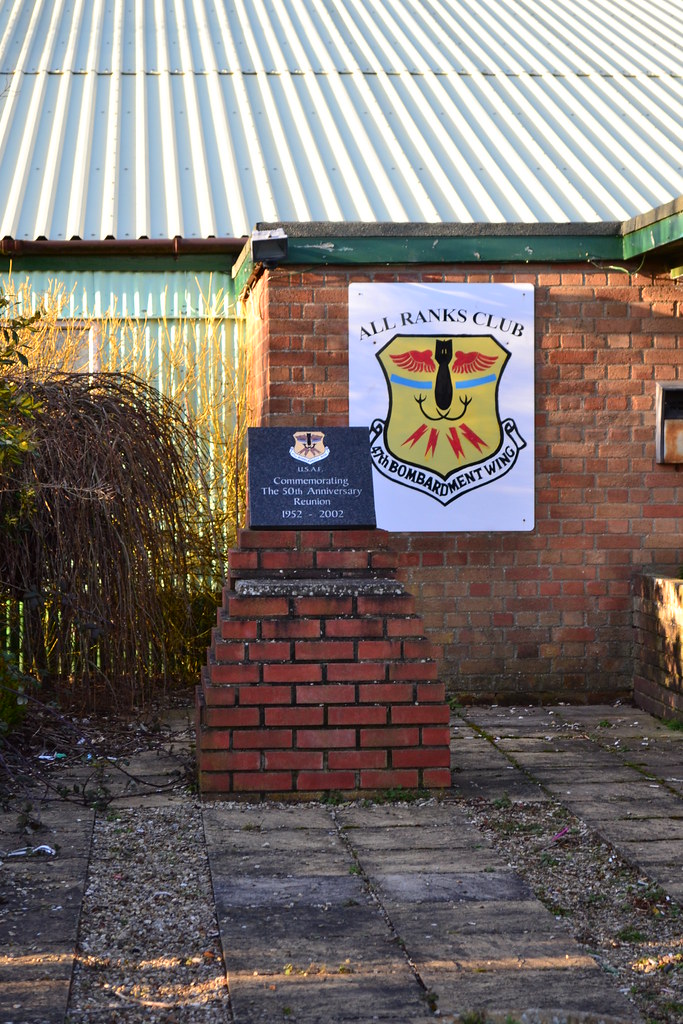
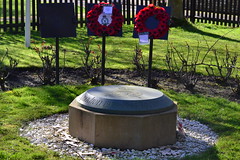
Two memorials are located at this site, the first in a public car park to the western end of the airfield, next to the Maelmin heritage trail. The second is located outside the club house of the Borders Gliding Club, approximately on the site of the former watch office, itself no longer there. This memorial was commissioned by the club entirely through donations and is their way of acknowledging the sacrifice of those who flew from Milfield.

Milfield is arguably one of the most significant airfields of the Second World War, many Spitfire, Hurricane and Typhoon pilots quote it in their memoirs, their time here short but memorable. Here ground attack pilots cut their teeth, low-level strafing and dive bombing techniques being honed to absolute perfection. The battle for Europe would certainly have been more difficult were it not for those daring young men who passed through this remote but historically important airfield.

After we leave Milfield, we head east, toward the coast and the satellite of Milfield. A small airfield, it too played a major part in the development of ground attack crews and it too saw many accidents and losses through its training programme. From here we go to RAF Brunton.

Sources and Further Reading.

*1 A website tells the story of Josephine Butler’s life, and another has photos of Galewood farm-house.

*2 Dunn, W.R., “Fighter Pilot: The First American Ace of World War II“,  1996, The University Press of Kentucky, Page 118.

*3 Border flying club website

The Friends of Berwick and District Museum and Archives website provide information about the archaeological history of Milfield.

A book has been published about RAF Milfield, a complementary website gives fabulous personal detail of life at the airfield and is well worth a visit.

Photos of those stationed at Milfield can be seen through the BGC Flckr account.

The Borders – RAF Charterhall (Part 3)

We carry on from Part 2 of Trail 41 for the final Part of RAF Charterhall. An airfield that had become known as ‘Slaughterhall’ it was about to see a new breed of aircraft, perhaps even a turn in luck.

RAF Charterhall

The main runway at Charterhall looking south.

The night of May 27th – 28th 1944 was a heavy night for Bomber Command, with large numbers of four engined heavies attacking targets in Germany.  On their return, ten Lancaster bombers were diverted to Charterhall, the first time the four engined bombers would use the airfield, but not the last. On the 8th June, another seven were to arrive, also diverted on their return from the continent. Then in July, a Halifax was diverted here after sustaining heavy flak damage over Helioland. The pilot, P/O W. Stewart of the RCAF and navigator P/O K. Evans (RAF) were both awarded DFCs for their action whilst badly injured, such was the determination to get all the crew and aircraft back safely.

July to October saw an increase in flying and an increase in accidents. July ‘led the way’ with heavy landings, burst tyres, ground collisions and engine failures being common place. The majority of these incidents were Beaufighter MKIIfs, some were visiting or passing aircraft who suffered problems and had to divert. Charterhall saw a mix of Lysanders, Barracuders, Beauforts, Wellingtons and Hurricanes all use Charterhall as a safe haven.

As the threat of attack was now diminishing, a reorganisation of the O.T.Us would see 9 Group disband in September that year. The responsibility of 54 O.T.U (now flying mainly Mosquitoes) and Charterhall would now pass to 12 Group.

Eventually 1944 turned to 1945 and the year that saw for 17 fatal crashes also saw 54 O.T.U. take on more aircraft and more crews.

January 1945 was incredibly harsh in terms of weather and the cold. Training new crews on new radar meant that Wellingtons were brought into Charterhall. Small teams of pupils would take turns to operate the radar to detect Hurricane ‘targets’. These new models increased the air frame numbers at Charterhall to 123 by the end of January.

RAF Charterhall

‘No. 1’ Building on the Technical site.

By now the allies were winding their way into Germany, pressure was increased by Bomber Command and so more heavies were to find Charterhall a refuge when the weather closed in. On the 15th February a large ‘Gardening’ operation led to 12 heavies landing at Charterhall along with four Mosquitoes who had been flying with them over Norway. All these aircraft were able to return to their various bases at Skipton-On-Swale, Leeming and Little Snoring the next day.

Two days later, more aircraft were to find Charterhall (and Winfield) needed. Some 266 aircrews – an incredible influx for one night – were going to need bedding – billiard tables, sofas and chairs suddenly became in very short supply.

The poor weather continued well into the year and snow caused some ‘minor’ accidents at Charterhall. The first confirmed death was not until early March and others were to follow. By May the war had come to an end and operations began to wind down. Winfield was closed and crews returned to Charterhall. Beaufighters were gradually sold, scrapped or moved elsewhere, and by August the last aircraft had left.

March would see the last fatalities at Charterhall, both in Mosquitoes on the 25th and 29th. In the former, the aircraft was in a high-speed vertical crash and the latter the pilot, Flight Lieutenant Cole (s/n125484), overshot the runway and crashed his Mosquito FBVI (HR297) a mile south of the airfield. He was 22.

Apart from a small detachment of crews from 770 Squadron Naval Air Branch carrying out trials, operations began slowing down. After VJ day, the Mosquito numbers were also wound down, only fifty-one aircraft remained by the end of August.

In September the order came through to vacate Charterhall and the packing began. By the end of the month 54 O.T.U. had all but vacated leaving Charterhall quiet once more. The last eighty aircraft consisting of: Mosquito VI,  XVII and NF30s, Martinets, an Oxford, Miles Master II, Ansons, Hurricane IICs and Wellington XVIIIs were flown out for the final time, 54 O.T.U. had played its part and their end lay ahead.

In the three years that Charterhall had been in operation, they had passed over 800 crews for night fighter operations, they had suffered over 330 accidents, 56 of which had resulted in deaths. During this time crews had flown just short of 92, 000 hours flying time day and night, with almost a third being carried out at night. Had it not been for this unit, the heavy bombers of Bomber Command may well have suffered even greater losses, the determined and deadly night fighters of the Luftwaffe may have had a much wider and easier reign over our skies and the losses we quote today would be even higher.

But the withdrawal of 54 O.T.U. was not the demise of Charterhall. For a short period it was set up as No 3 Armament Practice Station, designed to support and train fighter pilots in the art of gunnery. During its period here November 1945 – March 1947 it would see a range of aircraft types grace the runways of Charterhall.

The first units were the Spitfire IXB of 130 squadron from December 1st 1945 – January 24th 1946, followed by 165 Squadron’s Spitfire IXE between 30th December and January 24th 1946. On the day these two squadrons moved out, Charterhall entered a new era as the jet engines of Meteor F3s arrived under the command of 263 Squadron. After staying for one month they left, allowing the Mustang IVs of 303 (Polish) Squadron to utilise the airfield. Each of these squadrons followed a course which included air-to-air target practice, ground attack, bombing and dive bombing techniques.

Following the completion of the course 303 pulled out and the order was given to close No. 3 Armament Practice Station and wind Charterhall down for good. The RAF sent no further flying units here and apart from a detachment of Mosquitoes from 772 Squadron of the Fleet Air Arm, by the following summer, it had closed. The final spin of the airscrew had taken place.

Post war, the airfield was left, the runways and buildings remained intact and the airfield was used by small light aircraft. Gradually though it fell into disrepair, used mainly for agriculture, it had a new lease of life when on Saturday May 31st, 1952, the airfield saw its first motor race using sections of the perimeter track and runways. A two-mile track became the proving ground for a number of the worlds most famous racing drivers including: Sir Stirling Moss, Jackie Stewart O.B.E., Roy Salvadori, Sir John Arthur ‘Jack’ Brabham, AO, OBE, Giuseppe “Nino” Farina and local boy Jim Clark O.B.E. Clark cut his racing teeth at Charterhall, eventually winning 25 Grand Prix races and the Indianapolis 500 in 1965. His grave lies in nearby Chirnside cemetery alongside his mother and father. Charterhall also saw the appearance of Scotland’s first organised sports car team, ‘Ecurie Ecosse’, using Jaguar cars*4. Racing occurred here until 1969, when the current owners took over the site.

The RAF then returned briefly in late 1976 undertaking trials of the Rapier ground-to-air missile system, in which a range of fast jets including Jaguars and Phantoms would participate. These lasted a month which would see the last and final RAF involvement end.

The owners reinvigorated the site providing a venue for rally sport events which started again in 1986. Eventually on March 30th, 2013, the last ever race was run and motor sport stopped for good and so another era finally came to a close.*5

RAF Charterhall

Jim Clark’s grave stone at Chirnside.

Today a section at the western end of the main runway is still available for use by light aircraft (with prior permission) and the main technical area is home to the Co-op Grain store, a facility which has a number of large stores for drying and storage of grain.

Accessing the site is from the B6460 where a memorial stands to the crews who passed through Charterhall and in particular Flight Lieutenant Hillary and Flight Sgt. Fison, who died in such tragic circumstances. A track leads all the way to the airfield site, which was the main entrance to the airfield. A good quantity of buildings still stand here on the technical site along with two of the original hangars. All of these are used for storage or stabling of animals including horses and are rather rundown. The perimeter track and runways are complete but their surfaces are breaking up and in a poor state of repair.

These buildings are a remarkable and poignant reminder of the tragic but significant years that Charterhall prepared and developed crews for the night fighter squadrons of the RAF. Hundreds passed through here, for many it was a difficult twelve weeks, for some it ended abruptly and decisively. Not known for its comforts, it was a pivotal station in the Second World War and indeed also for many years after for the those who went on to become some of the world’s most famous motor racing drivers.

Many airmen came and stayed, sixteen of them who were killed on active service whilst at Charterhall are buried in the nearby cemetery at Fogo, a short distance to the north of the airfield. Many are from around the commonwealth who came here to help and were never to return.

After leaving Charterhall, we head a little further east to Charterhall’s satellite and a site that had strong links with the forces of Poland. Remembered here is an usual mascot, a bear known as ‘Wojtek’. We stop off a few miles away at the satellite that was RAF Winfield.

Sources and further reading

*4 Obituary of Bill Dobson: ‘Ecurie Ecosse’ racing driver in ‘The Scotsman‘ newspaper 21st October 2008.

*5 A news report of the event can be read on ‘The Berwickshire News‘ Newspaper, 28th March 2013.

Sqn. Ldr. Leonard Trent VC – RAF Methwold.

RAF Methwold was a small airfield that was never intended to be a major player in the Second World War, yet it would see some remarkable achievements performed by the people who were stationed there.

Once such notable person was Squadron Leader Leonard Trent V.C., who, on 3rd May 1943, took a squadron of Lockheed Venturas on a ‘Ramrod’ Mission to attack an electricity power station on the northern side of Amsterdam.

As part of a larger attack, it would not be a mission central to Bomber Command’s overall bombing strategy, but more a mission of support and encouragement to the resistance fighters bravely fighting in occupied Holland.

Trent (N.Z.248i), born in Nelson, New Zealand on 14th April 1915, achieved his wings with the RNZAF in Christchurch in May 1938, a month before sailing to England and a role with the Royal Air Force.

At the outbreak of war he was sent with No. 15 Squadron flying Fairy Battles, to France to carry out photo-reconnaissance sorties over occupied territory. The squadron then moved back to England (RAF Wyton) and changed their Fairy Battles for Bristol Blenheim IVs.

After carrying out a number of low-level attacks, he was awarded a DFC for his part in the air war over Belgium, after which he became a flying instructor for RAF crews.

Wing Commander G J “Chopper” Grindell (centre), Commanding Officer of No. 487 Squadron RNZAF, with his two flight commanders in front of a Lockheed Ventura at Methwold, Norfolk. On his left is the ‘A’ Flight commander, Squadron Leader T Turnbull, and on his right is the commander of ‘B’ Flight, Squadron Leader L H Trent. (IWM)*1

In 1942 he returned to operational duties as a newly promoted Squadron Leader taking command of B Flight, 487 (NZ) Squadron at Feltwell. At the time 487 were part of No. 2 Group and were in the process of replacing their Blenheims with Venturas. The squadron moved from Feltwell to Methwold in early April 1943. Little did they know that only a month later, the Squadron’s Operations Record Book would read: “This is a very black day in the Squadron history…a better set of boys could not be met in 30 years. Everybody is still feeling dazed by the news.”

As an experienced pilot Trent would fly several low-level missions over the low countries, using an aircraft that was originally designed around a small passenger aircraft back in the United States. Whilst having powerful engines, Venturas suffered from poor manoeuvrability and a heavy air frame, these two failings combined with its rather ‘fat’ appearance, earned it the name “flying pig”.

Loses in Ventura operations would be high, and this was reflected nowhere else than on the very mission that Trent would fly on May 3rd 1943.

On that day fourteen Venturas of 487 Sqn were detailed to attack a target in Amsterdam, however only twelve aircraft actually took off, all at 16:43 from RAF Methwold. These aircraft were all part of a much wider operation, one that would involve an escort of nine RAF fighter squadrons. Timing was therefore crucial, as was low-level flying and maintaining the element of surprise. Within five minutes of their departure though, ‘EG-Q’ piloted by Sgt. A. Baker, would return after losing the crew escape hatch. This left eleven aircraft to carry on to the target.

A diversionary attack carried out by aircraft of 12 Group flying ahead of the main formation flew in too high, too soon, thus losing the surprise and alerting the defenders of the impending attack. Caught out by low fuel, many of the escorting fighters had to then leave thus reducing the overall effectiveness of the defensive escorting force. The Luftwaffe, now ready and waiting, had scrambled numerous fighters, a deadly cocktail of FW-190s and Bf-109s. The squadron record book reports an estimated “80+ ” enemy aircraft in the locality of the attacking Venturas.

From this point on things went very badly for 487 Sqn.

As they crossed the Dutch coast Ventura ‘AJ478’ (EG-A) was attacked and shot down by Luftwaffe fighters. Ditching in the sea the crew took to a life raft where Sgt. T Warner, injured in the attack, died of his injuries. Committing his body to the sea the remaining three would be captured and become prisoners of war. Warner’s body would wash up two days later on a Dutch beach and be buried in the small town of Bergen op Zoom – all four were from New Zealand.

A second aircraft, ‘AE916’ (EG-C) was also very badly shot up by the pouncing fighters. However, it managed to return to England landing at their former base RAF Feltwell. The pilot and navigator were both unhurt, but the wireless operator and air gunner were both badly wounded, and were immediately taken directly the RAF hospital at Ely, Cambridgeshire. The aircraft was so badly damaged in the attack that it was written off. For their actions the pilot (F/Lt. Duffill) and navigator (F.O. Starkie) were both awarded the DFC, whilst the wireless operator (Sgt. Turnbull) and gunner (Sgt. Neill) the DFM.  Dufill later went on to become the managing director of Humbrol paints, a company renowned for its paint and modelling supplies.

Pressing on to the target, the casualties got worse and the loss rate increased.

Firstly, Ventura ‘AE684’ (EG-B) was shot down at 17:45 near Bennebroek with the loss of two; at the same time ‘AE731’ (EG-O) was shot down  just north of Vijfhuizen, three crewmen were captured but the fourth, Sgt. Tatam, died. Five minutes later at 17:50, ‘AE780’ (EG-S) was lost, with only one crew member surviving – the aircraft crashing into the suburbs of Amsterdam. Within three more minutes, a fourth aircraft of this group would go down; ‘AE713’ (EG-T) was hit, also causing it to crash in the northern suburbs of Amsterdam, this time killing all on board. By 18:00 there were only two of the eleven aircraft left, ‘AJ209’ (EG-V) flown by Squadron Leader Leonard Trent, and ‘AE716’ (EG-U) flown by F.O. T. Baynton.

Baynton’s aircraft, ‘EG-U’, would then be shot down by fighters causing it to crash in the outskirts of Amsterdam, also killing all four on board. Squadron Leader Trent, seeing all around him fall from the sky, pressed on. Flying toward the target he dropped his bombs and then turned away. Trent bravely and coolly defended his aircraft, shooting down a Bf-109 with his forward facing guns. Shortly after, he too was hit, the aircraft badly damaged, spiralled earthward uncontrollably, breaking up as it did so, throwing both Trent and his navigator F.L. V. Philips, out of the falling wreckage.

Both Trent and Philips were later captured and taken prisoner, the other two crew members; F.O. R. Thomas and Sgt. G. Trenery, both lost their lives in the crash.

One further aircraft, ‘AJ200’ (EG-G) piloted by New Zealander Sgt. J Sharp was thought to crash 3 km west of Schiphol, with only Sharp surviving; whilst the remaining two unaccounted aircraft, ‘AE956’ (EG-H) and ‘AE 798’ (EG-D), were lost over the sea on the way to the target. All eight crewmen were presumed killed, two of them being washed up several days later on the Dutch coast. The remainder were never heard from again.

In the space of only a few minutes, eleven aircraft had been attacked and ten shot down with the loss of 28 young RAF lives.

operations-record-page

The Operations Record Book for May 3rd 1943, shows the depth of feeling felt by the crews at Methwold following the disastrous mission. (Crown Copyright*2)

Trent spent the remainder of the war in Stalag Luft III where he participated in the ‘Great Escape‘. Only on his eventual return to England did the full and disastrous story of what had happened come out. He was awarded the Victoria Cross for his leadership in ensuring the bomb run was completed despite heavy enemy resistance and very high losses. The London Gazette published his citation on Friday 1st March 1946, in the Third Supplement which said:

“Before taking off, Squadron Leader Trent told the deputy leader that he was going over the target, whatever ‘happened…”

It later went on to say…

“On this, his 24th sortie, Squadron Leader Trent showed outstanding leadership. Such was the trust placed in this gallant officer that the other pilots followed him unwaveringly. His cool, unflinching courage and devotion to duty in the face of overwhelming odds, rank with the finest examples of these virtues.” *3

A determined attack, it was flawed from the moment the preceding force were spotted. The Venturas, woefully inadequate and unprotected, were literary cut down from the sky. Fighters escorting the Venturas confirmed seeing seven parachutes from the aircraft, but the scale of the loss was a blow so devastating, it left only six operational crews in the entire squadron.

For many days after, the Operational Record Books indicated “no news of the boys“, and as new crews and aircraft arrived, prayers for their return faded, but hopes for a return to operational status rose. Following a number of training flights, the next operational mission would finally take place on May 23rd, a mission that was a total success, and one that must have boosted the morale of the squadron immensely.

This mission was a disaster for the Royal Air Force and for Methwold in particular. The loss of life dealt a huge blow to the community both on, and around the base. In memory of these gallant young men, many of whom were never found, their names are inscribed on the Runnymede memorial, whilst those whose bodies were recovered, remain scattered in various graves across the Dutch countryside.

May their memories live for evermore.

RAF Methwold appears in Trail 8.

Sources and further reading.

*1 Photo source The Imperial War Museum Collections

*2 AIR\27\1935\13

*3  The London Gazette: (Supplement) no. 37486. p. 1179. 26 February 1946. Retrieved 29th January 2017

AIR\27\1935\13 – Operational Records Book (summary), The National Archives

AIR\27\1935\14 – Operational Records Book (work carried out), The National Archives

Chorley, W.R., Bomber Command Losses, 1943, Midland Counties, 1996

RAF Methwold – unassumingly famous.

The East Anglia countryside is littered with remnants of the Second World War. The massive build up that occurred here in the mid 1940s has led to changes in both landscape and culture, the ‘friendly invasion’ as it has become fondly known, had a huge impact on the towns and villages around here. An area rich in aviation history there are numerous tales of heroism and valour to be found.

Whilst on the eighth Trail of aviation sites, we stop at the former site that was RAF Methwold.

RAF Methwold

Methwold Village sign

Methwold village sign

Located between Downham Market and Thetford, Methwold is a small rural setting on the edge of Thetford Forest. Its village sign and combined memorial, remind the passer-by of its strong air force links – a Lockheed Ventura taking off over the village church.

Methwold was actually built as a satellite for nearby RAF Feltwell and as such, had few squadrons of its own. Being a satellite its runways were of grass construction with little in the way of luxuries for accommodation.

On the day war broke out in Europe, 214 Squadron, equipped with Wellington MKIs, moved from RAF Feltwell to here at Methwold. Feltwell being larger, offered a prime target for the Luftwaffe and so their loss would be Methwold’s gain. The first production Wellington, the MKI was powered by two 1,000 hp Bristol Pegasus XVIII radial engines, and would soon be updated and replaced by the MKIA; the main difference being a change in gun turret from the Vickers to the Nash & Thomson. As part of Bomber Command, 214 Sqn did not carry out its first operational bombing flight until June 1940 some four months after it had left Methwold; but that is not to say casualties were not suffered.

On Monday November 6th 1939, Wellington L4345, crashed whilst circling on approach to Methwold. The accident resulted in the deaths of both crewmen, Pilot Officer J. Lingwood and Aircraftman 1, – A. Matthews.

Tragic accidents were not uncommon in these early stages of the war, another similar incident occurring at Methwold only a month later. In mid December, Pilot Officers W. Colmer and R. Russell-Forbes, along with Leading Aircraftman J. Warriner, were all killed whilst on approach to the airfield flying in another Wellington, R2699. Both these Officers were only recently commissioned and were still considered relative flying ‘novices’.

In February 1940, 214 Sqn departed Methwold and transferred to RAF Stradishall leaving only a small number of Wellington IIIs of 57 Sqn detached from their parent station at Feltwell. These would, in September 1942, be replaced by the mighty Lancaster, the four engined bomber that formed the backbone of the RAF’s Bomber Command.

The Intelligence Room of No. 140 Wing, No. 2 Group, at Methwold, Norfolk. © IWM (HU 81315)

Little happened at Methwold for the next two years, then in October 1942, 21 Sqn arrived. After having flown many missions against coastal targets in the Mediterranean, they were disbanded at Luqa only to be reformed and re-equipped at Bodney the same day. After changing their Blenheims for Venturas in May 1942, they transferred to RAF Methwold where they stayed for six months.

Operating both the Ventura MKI and II, they were the first Bomber Command squadron to re-equip with the type, and were one of the small number of squadrons who took part in the famous Eindhoven raid, attacking the Philips radio factory in December 1942. The daring Operation Oyster, would see the loss of sixteen aircraft – three of which belonged to 21 Sqn. Two of these aircraft crashed in enemy territory, whilst the third ditched in the North Sea after having been hit by enemy gunfire. Using a mix of Venturas, Bostons and Mosquitos, this mission perhaps revealed the true vulnerability of such aircraft over enemy territory, a warning that would violently repeat itself in the months to come.

The spring of 1943 would again see changes at Methwold; as 21 Sqn departed, the ‘Flying Dutchmen’ of 320 (Dutch) Sqn would move in. 320 Sqn, were formed after the German forces invaded the Netherlands and consisted of mainly Dutch nationals. They carried out both anti-shipping and rescue duties before transferring, from Leuchars, to Methwold via Bircham Newton. Upon arriving here, 320 Sqn was absorbed into No. 2 Group and would shortly swap their Hudson VIs for Mitchell IIs. After a very short transfer period, they then departed Methwold, moving to the much larger base at Attlebridge.

Two further squadrons of Venturas arrived at Methwold in the early spring of 1943. Both 464 (RAAF) and 487 (RNZAF) Sqns were formed, transferred and disbanded in unison, and both consisted of commonwealth crews. Having entered the war in a baptism of fire, they also flew alongside 21 Sqn on the Eindhoven raid; 464 Sqn contributing fourteen aircraft whilst 487 contributed sixteen – each squadron losing three aircraft and all but four of the twenty-four crewmen.

DSC_0029

One of the original hangers

The Venturas earned themselves the unsavoury title the ‘flying pig‘ partly due to their appearance and partly due to poor performance. Based on the Lockheed Model 18 Lodestar, it was primarily a passenger aircraft and even though it had powerful engines, it performance was low and so operational losses were often high.

On May 3rd 1943, whilst on a ‘Ramrod‘ mission, eleven out of twelve (one returning due to engine trouble) 487 Sqn aircraft were lost to enemy action, and all but twelve of the forty-four crewmen were killed. Of these twelve, Squadron Leader Leonard H. Trent, was captured and taken to Stalag Luft III where he participated in the ‘Great Escape‘. On his eventual return to England at the end of the war, he was awarded the Victoria Cross for his leadership in ensuring the bomb run was completed despite heavy enemy resistance and very high losses.

In the summer of 1943, both 464 and 487 Squadrons became part of the newly formed Second Tactical Air Force; a move that led to their departure from Methwold, along with a new role and new aircraft.

Following their departure, Methwold was passed over to 3 Group and was designated to receive the heavy four-engined bombers of Bomber Command. To accommodate them, the site was upgraded to Class ‘A’ standard. Three runways were built, five hangars (four ‘T2s’ and one ‘B1’) were erected, and a wide range of ancillary buildings added. Aircraft dispersal consisted of 36 hard standings mainly of the spectacle type.

The incoming ground and aircrews would be accommodated in areas to the east of the airfield, buildings were sufficient for a small bomber site of some 1,800 men and just over 300 women, by no means large.

In this interim period on March 13th, a lone American P-47 #42-74727, suffered engine failure whilst on a routine training flight in the area. In an attempt to land at Methwold, the P-47 Thunderbolt crashed, slightly injuring the pilot but writing off the aircraft.

The first of the heavy bombers to arrive at the newly constructed Methwold were the mighty Stirling IIIs of 218 Sqn. A small detachment from RAF Woolfox Lodge, they would operate from here along side 149 Squadron who moved here from RAF Lakenheath in May 1944. 149’s record so far had been highly distinguished. Participating in the RAF’s second bombing mission of the war on September 4th, they had gone on to take part in the first 1,000 bomber raid, attacked prestige targets such as the Rhur, and had taken part in the Battle of Hamburg. They had also been in action in the skies over the Rocket development site at Peenemunde. They had gone on to drop essential supplies to the French Resistance, and one of its pilots, Flight Sergeant Rawdon Middleton, had won the VC for his valour and determination in action. 149 Sqn would go on with the offensive right up until the war’s end, replacing the ill-fated Stirlings with Lancaster MKIs and later the MKIIIs in August 1944.

During the D-Day landings, 149 Squadron were tasked with dropping dummy parachutists away from the Normandy beaches. As part of Operation Titanic, they were to deceive the German ground forces, aiming to draw them away from the Normandy beaches, thus reducing the defensive force. A task that proved relatively successful in certain areas of the invasion zone, it caused confusion in the German ranks and pulled vital men away from drop zones. During this dramatic operation, two 149 Sqn Stirlings were lost; LJ621 ‘OJ-M’ and LX385  ‘OJ-C’ – with all but three of the eighteen crew being killed.

In August 1944, 218 Sqn moved the remaining crews over to Methwold completing the unit’s strength once more. This move also led to them taking on the Lancaster MKIs and IIIs. 218 Sqn was another squadron with a remarkable record of achievements, its most notable being the VC posthumously awarded to Flight Sergeant Arthur Aaron for his ‘most conspicuous bravery’ whilst at RAF Downham Market.

As the allied advance moved across Europe, 149 Sqn supported them. In December 1944, 218 Sqn departed Methwold taking their Lancasters to RAF Chedburgh and disbandment the following year. 218’s losses were not over though, just days before the war’s end on April 24th 1945, Lancaster NF955 ‘HA-H’ crashed on take off, the last fatality of the squadron’s operational record. For 149 Sqn food packages replaced bombs as the relief operation – Operation Manna – took hold. After the fall of Germany in 1945, 149 Sqn ferried POWs back to Methwold in Operation Exodus, and for many, it was their first taste of freedom for many years.

The final squadron to be stationed at Methwold was 207 Squadron, between October 1945 and the end of April 1946 also flying the Lancaster I and III. As with many other bomber command squadrons, its history was also long and distinguished; flying its final mission of the war on 25th April 1945, against the SS Barracks at Berchtesgaden. During its wartime service 207 Sqn had completed some 540 operations, lost 154 crews and earned themselves a total of 7 DSOs, 115 DFCs and 92 DFMs.

In 1946, the Lancasters of 149 Squadron departed Methwold and all fell quiet. The site was officially closed in 1958 and the land returned to the former owners. In the early 1960s, much of the concrete was removed for hardcore, buildings were demolished and the land returned to agriculture, a state it primarily survives in today.

RAF Methwold

Stores huts used for light industry

Methwold airfield is located south of the village of Methwold, accessible by the B1112. As you drive along this road, the technical area is to your left and the main airfield to your right. The entire site is primarily agricultural, with some of the remaining buildings being used for farming purposes or light industry. Many of these are accessible or at least can be seen from the main public highway.

Large parts of the runways do still exist, although much of them are covered in newly developed industrial units, or are hidden away on private land. These most notable developments are at the northern end of the runway closest to Methwold village. However, best views of what’s left, are from the southern end, along a farm track that was once the perimeter track. Also here, is a single large and original ‘T2’ hangar, now used for storing agricultural equipment and other farm related products. This main north-westerly runway, built later in the war, is also used for farm related storage. Divided by a large fence, it is now part track and part storage. The remaining sections of perimeter track, a fraction of its original size, allows access to the runway past the hangar to an area of development further south to where the turret trainers once stood. Also visible here, is the Gymnasium built to drawing 16428/40 later adapted by the addition of a projection room (889/42) for recreational films.

Back alongside the B1112 hidden amongst the woods, is the technical area. Here in between the trees are the former technical huts and workshops now used by small industrial units, many of which survive in varying conditions, some of these are accessible to the general public.

RAF Methwold

One of the former runways looking north-west.

Methwold was never intended to be major player in the war. home to a small number of squadrons, it housed a variety of aircraft and a number of nationals who all combined, tell incredible stories of heroism, bravery and dedication. The squadrons who passed though here, carried out some of the RAF’s most daring raids, whether it be as part of a thousand bomber raid, a small force to attack the heart of Reich, or a diversionary raid to foil air and ground forces.

Methwold is now quiet, agriculture has taken over. The sound of heavy piston engines are now replaced by the sound of tractors, the buildings that once housed brave young men and their incredible machines now home to the machinery of food and farming. The small remnants of Methwold hold stories of their own, for it is here that history was made, war was won and lives were lost – and all in a very unassuming manner.

Notes and further reading:

Methwold appears in Trail 8 and was originally visited in April 2013.

Local information and further detail is available from the local Methwold history group.