A guest post written by Dr. Donough Wilson to whom I owe my thanks for the write up and information about the tragic accident of Stirling LK380 ‘Y’, of 90 Squadron, RAF Tuddenham, 12:30, 9th November 1943, 80 years ago.
Stirling III “Y” Yorker, 90 Squadron, Wratting Common and Tuddenham, July – November 1943
On Saturday 31 July 1943 a newly qualified crew were ‘posted in’ to ‘C’ Flight, 90 Squadron at RAF Wratting Common, Cambridgeshire. They comprised PO. Robert (Bob) Rodger [Pilot]; PO. Cliff Mitchell [Navigator]; Sgt. Robert (Tug) Wilson [Bomb aimer]; Sgt. Leslie Griffiths [Wireless Operator]; Sgt. Roy Child [Mid-Upper Gunner]; Sgt. Howell Jones [Rear Gunner (Australian)] and Sgt. Ed Daveny [Flight Engineer].
Six days later on the night of 6th/7th August, they completed their first mission, which was mine laying near Ile de Ré, La Rochelle, on the French west coast.
Their third mission on the night of the 23rd/24th August was to Berlin. What is significant about this raid is that they were caught and ‘coned’ by searchlights and then attacked by a JU.88 night fighter. As the crew called out information for Bob Rodger to act on, he threw the Stirling into a series of violent corkscrews in an attempt to evade their pursuer and stop themselves being shot down. This action luckily saved their lives and allowed them to fly again.
Between then and the end of September, further missions were flown to Nuremberg, Munchen Gladbach, Berlin again, Mannheim and Boulogne.
Prior to the second Berlin mission, a photographer from the national newspaper “The Daily Sketch” took a photograph of most of “Y” Yorker’s crew walking to their aircraft. Published on the front page of the newspaper, the caption read: ‘Sunset and zero hour before the great raid on Berlin. One of the crew is just aboard’

The photograph depicts from left to right Robert ‘Tug’ Wilson, Roy Child, Leslie Griffiths, Bob Roger, Arthur Stubbs the ground crew chief (nearest camera), Ed Daveny and bringing up the rear Howell Jones. Cliff Mitchell is missing from the photograph*1.
In the squadron records summary for September 1943, Pilot Officer Rodger was by then being listed as the second most experienced surviving pilot in ‘C’ Flight (behind Squadron Leader C. H. Wilson, who would go on to win the DFC and was shot down on 31 March 1944), and on October 1st, was promoted to Flight Lieutenant.
In early October, they flew missions to Kassell, Frankfurt, and Bremen, it was on the Bremen raid that the crew flew a new aircraft, LK380 “Y” Yorker. After Bremen they carried out some training flights before going on leave. Whilst the crew were away, 90 Squadron moved to RAF Tuddenham.
On Tuesday 9th November 1943, Bob Rodgers, now Flight Commander of ‘C’ Flight, took the pilot and two gunners of a new crew who were joining ‘C’ Flight, along with his own crew, on a training exercise in LK380 “Y” Yorker.
The task was to teach the new pilot and gunners the techniques of fighter evasion. The exercise would take place over the Shippea Hill area not far from RAF Mildenhall, which was not far outside of the Tuddenham circuit. The crew of “Y” Yorker were, by that time, considered an experienced crew having successfully completed ten missions over enemy territory, and successfully evading both ‘searchlight coning’, and attacking night fighters.
The three additional crew members joining Rodger’s crew for that exercise were Flight Sgt. Lees Smith [pilot], Flight Sgt. Morley Loyst [Mid-upper gunner (Canada)] and Sgt. Gordon Batten [Rear Gunner]. But missing from the flight was Roy Child, who was grounded with a medical condition.
That meant there were nine crew on board the Stirling that day, including British, Australian and Canadian airmen, a truly multinational mix.
They soon met-up with the training Hurricane IV, KW800, of the Air Fighting Development Unit, from RAF Wittering piloted by Flight Sgt. Ronald Brown (a veteran of Malta with thirty operations under his belt already). Brown had already completed one exercise that day with another 90 Squadron Stirling III, “T” Tommy, On joining with the Hurricane “Y” Yorker’s training quickly began.
“Y” Yorker was observed to be heading south, as if returning to Tuddenham. On approaching the area of the railway line and Shippea Hill level crossing, the Hurricane was seen to dive in a simulated rear attack. It swooped under the belly of the Stirling and then pulled-up into a climbing turn to the right, but unfortunately the pilot misjudged the distance between them, and sliced into the right wing of the Stirling, cutting-off the starboard outer engine along with a four-foot section of wing.
Both aircraft were mortally crippled. Flight Sgt. Brown baled out, but due to the low height he collided with telegraph wires and broke his legs. At 12:30 The Stirling reared up, rolled, and dived into the fen alongside the railway line, 150 yards from the Shippea Hill level crossing on the Mildenhall side. There were no survivors.
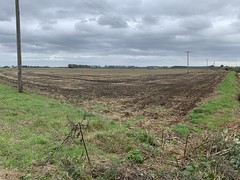
The crash site of 90 Sqn ‘Y’ Yorker. Shippea Hill level crossing is behind the photographer.
Although the bomber quickly sank in the boggy fen, unidentifiable partial remains of three crew were recovered immediately. A fourth body was recovered some days later, and a fifth was recovered in 1944. Four crew remain unaccounted for to this day.
In St. John’s Church, Beck Row, alongside Mildenhall airfield, is a memorial in the form of a recovered propeller blade from “Y” Yorker to the nine crew that lost their lives that day.

The Propeller commemorating 90 Sqn’s “Y” Yorker that crashed 9th November 1943*2.
In the Commonwealth War Graves plot adjacent to the church, amongst the other war dead, are the five graves of the airmen who were recovered from “Y” Yorker, each marked ‘An Unknown Airman, 9th November 1943’.
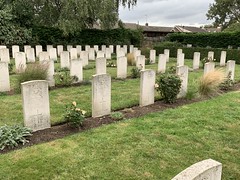
(From front left)The five Graves of the crew 90 Sqn ‘Y’ Yorker – Marked “Unknown airmen”
All of the crew members including those never found, are commemorated on the Royal Air Forces Memorial at Runnymede.
Dr. Donough Wilson
My sincere thanks go to Dr. Wilson for writing the post. I myself tried to get to St. John’s Church but on the day I went it was sadly closed, I shall endeavour to return and locate the propeller.
Sources and additional information.
*1 The photograph was originally taken by, and published in, “The Sketch” newspaper, in 1943, but in the book “Final Flights” (1989) Ian McLachlan (Patrick Stephens publishers), it is credited to the late Jim Munro, secretary of the 90 Squadron Association. On the Wratting Common history website [www.wcnhistory.org.uk] it is credited to Ron Pearson.
*2 Photo from St. John’s Church website
The mission history is from J. Munro’s 90 Squadron history “Sing High” (1989).
