RAF Tuddenham – The last of the FIDOs (Part 2)

In Part one, we saw Tuddenham’s opening to the war. A rather cold and uninspiring airfield, it housed the Stirlings of 90 Squadron. Now, the Lancasters were arriving and front line bombing missions were once again on the horizon. 

The first of these major operations was on the night of 10th/11th June, when seven Lancasters, a mix of MK.Is and MK.IIIs, left Tuddenham to bomb rail facilities at Dreux –  90 Sqn had at last returned to the ‘front line.’

Sadly it was not to be the best night for the squadron, of the seven Lancasters that departed, two never returned home. The first NE149 ‘WP-A’ and the second NE177 ‘WP-B’ (both MK.IIIs), crashing in France. Of the fourteen airmen on board, three evaded capture, one was caught, and the remaining ten were all killed – it was not the most auspicious start for the unit. 

With two more Lancasters lost that month – one on the infamous Gelsenkirchen raid in which seventeen Lancasters were lost – June had proven to be difficult, and even though Stirlings were still operating, the Lancaster had become the main type and it wasn’t going to be an easy ride to Christmas. Forty-three, 90 Sqn airmen had been posted as either ‘killed’ or ‘missing’ in June alone.

Bomber Command’s tactical support of the land based forces continued on until mid September, by which time, Harris was back in charge and Bomber Command could once again turn its attention to targets in the German heartland. As the allied forces moved ever closer, night raids turned to daylight as allied air power began to get its grip on the skies over Europe. 

In October, a new squadron would reform here at Tuddenham, 186 Squadron also flying Lancaster MK.I and IIIs. Originally having its roots on board HMS Argus in 1918, it was another unit that had had short spells of activity before being disbanded once again. In a very different guise to its original formation, this time it was born out of 90 Sqn’s ‘C’ Flight, there the differences cease and by the December,  the squadron had left Tuddenham moving to Stradishall where it remained until the war’s end, and its final disbandment once more. 

The remainder of the year was relatively quiet for the Tuddenham group, regular missions with little or no opposition meant losses were low, and results were generally considered successful. But with bad weather setting in across both the UK and the wider continent, many squadrons had days of being stood down. Tuddenham on the other hand, with their FIDO system, was able to put up more flights than many others. Indeed during the Battle of the Bulge in the Ardennes, 90 Sqn were one of the few units able to launch attacks when most others were fog bound. 

The dawn of 1945 brought hope for an end to the war as the allied war machine moved ever closer to Berlin. The German’s last ditch attempt in the Ardennes was eventually overrun, and bombing picked up as fair weather returned once more. 

On February 2nd, Wing Commander W. G. Bannister joined the squadron on attachment. On the same day as he arrived, he took off at 20:52 in Lancaster HK610 ‘WP-Z’ along with thirteen other Lancasters from the squadron. Around an hour later, the aircraft collided with Lancaster PD336 ‘WP-P’, striking the tail trapping the rear gunner, Sgt. K. Hudspeth, inside the turret by his legs. Injured, he lay slumped over his guns. The pilot turned the aircraft over the Wash and ordered the bombs dumped in the sea. The rear tyre of the aircraft was burst and the port side of the tail was badly damaged, maybe even missing, and the turret by now was hanging off the aircraft. The pilot ordered chutes to be put on, after which the mid gunner Sgt. G. Wraith, went to help Sgt. Hudspeth, pulling him back into the aircraft’s fuselage where he administered morphine. The Lancaster made its way back to Tuddenham, and with the radio knocked out, red flares were fired to inform ground staff of its difficulties. Badly damaged with injured on board, the Lancaster made a safe landing, thanks to the skill of the pilot and crew.

Bannister’s Lancaster however, did not recover from the collision. After striking ‘P’ for Peter, the aircraft fell from the sky, crashing at 21:25,  3 miles from Bury St. Edmunds;  sadly there were no survivors.   

March 1945 saw a return of the Stirling to Tuddenham with 138 Sqn*3 transferring from Tempsford with the MK.V. As soon as they arrived they began to replace these with Lancasters MK.I and IIIs. 138 Sqn had been heavily involved in clandestine operations with the SOE, dropping agents into occupied Europe. With the need for such missions now largely gone, operations were wound down and the Stirling squadron were to be upgraded to front line bomber status. The first operational mission under this new guise was planned for the 28th but postponed until the following day. Three aircraft were ordered and all returned safely after having bombed the target. 

As the war drew  to its conclusion, 90 Squadron turned their attention to Kiel with both mining and bombing to prevent a German withdrawal. By the of the month it was all but over and operation Manna was put into place. On April 30th, 90 Sqn began their part in dropping supplies to the Dutch – targeting Rotterdam. Drop zones were identified by red T.Is and / or white crosses placed on the ground. By the end of the month 23 tons of food supplies had been dropped by the one squadron alone. During May, they began flights to Juvincourt to collect and bring back prisoners of war, dropping them at various sites including Dunsfold, Tangmere, Wing and Oakley; the aircraft then returned to base before carrying out further flights. 

On the 25th, ‘Cooks tours’ began, aircrew flying ground crew to Germany to see for themselves the damage inflicted by the war on the German heartland, it was a harrowing site for many. 

RAF Tuddenham

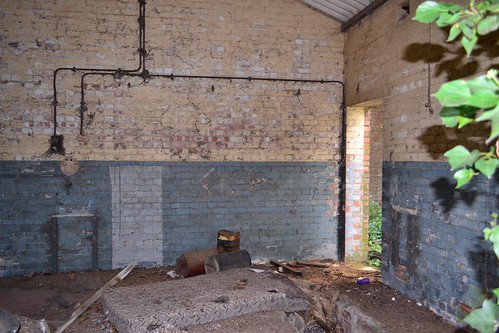
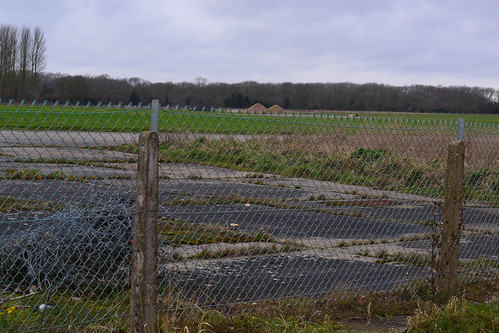
An electrical sub station shows its original RAF paint work

With no operational flying to do, training flights took over. It was a major change for  both the air and ground crews. As bases around the country began to close, so squadrons were moved around in preparation for disbandment. In April, two more Lancaster squadrons arrived here at Tuddenham, both 149 and 207 Sqns transferring across from RAF Methwold. The number of bomber squadrons now residing at Tuddenham totalling four.

Finally, in November 1946 the death knell finally rang for Tuddenham and it too was closed, flying ceased and the aircraft were all withdrawn. All four squadrons were pulled out of Tuddenham, 90 and 186 Sqns taking their Lancasters to RAF Wyton, whilst 149 and 207 went to RAF Stradishall. In what must have been a mass exodus, Tuddenham fell suddenly silent.

The airfield stood dormant for many years  whilst remaining in RAF hands, but then in 1953 life returned once more as the USAF arrived and used it as an ammunition storage area and renovation depot for surplus WWII ammunition and equipment. The American forces remained here for four years until 1957 when they too finally withdrew.

Tuddenham itself continued to stay in RAF ownership for a short while longer. As tension rose in the early part of the Cold War, ideal because of its low population and rural location, it was earmarked as a site for the new Thor missiles. New launch pads were built and a small section of the site was redeveloped accordingly.  Then in July 1959, 107 Squadron RAF reformed here, operating three of the Thor missiles as part of the UK-USA nuclear deterrent agreement. Retaining these until July 1963, the site finally closed once and for all. At this point all military personnel moved out and the gates were finally locked.

After this, Tuddenham was earmarked for quarrying to meet the rising demand for housing. Large sections were returned to agriculture, but a quarry opened to extract the much-needed materials for house construction. This operation has continued to the present day and has been responsible for the removal of large quantities of the main airfield site.

Visiting Tuddenham, reveals little of the history of the airfield and the people who stayed here. A few buildings, primarily the gymnasium and squash court remain standing, but in a very poor state and are likely to be pulled down soon. The roof has collapsed and part of the walls are missing. Located to the south of the airfield, they stand as reminders of those days long gone.

Other technical areas and the main part of the airfield, are now the workings of the quarry. The entrance to this site, rather insignificant, is part of the original perimeter track and is marked by an electrical sub-station. The shell is intact and complete with two blast walls, even the original RAF paint work can be seen! Overgrown and hidden beneath large thorns, this lone building will no doubt soon go the way of others some distance away.

Tuddenham airfield now stands lonely, large parts excavated and gone along with the memories of those who were stationed here. A pig farm covers a large part of the southern section and very little remains other than a few dilapidated buildings whose days are also very numbered. Tuddenham’s place in history is most certainly confined to the books and the memories of those whose numbers are also rapidly diminishing.

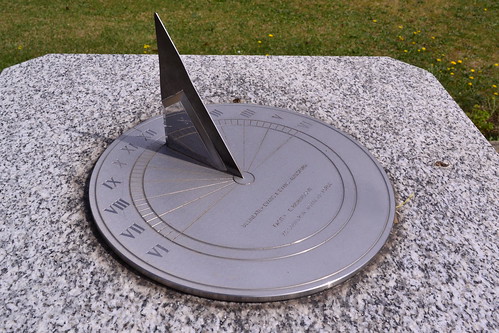
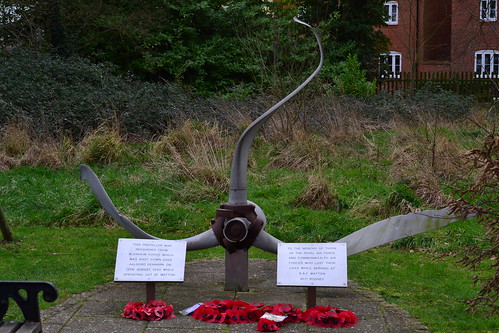
Before leaving Tuddenham, return to the village and stop at the village green. The village sign depicts a Lancaster flying low over the Suffolk landscape. A sundial, beautifully crafted marks the history of 90 Sqn, both the aircraft flown (1917 – 1965) as well as the airfields they were stationed at throughout their life. A superb tribute to a once active airfield and the gallant heroes of 90 Squadron Royal Air Force who served here*4.

RAF Tuddenham

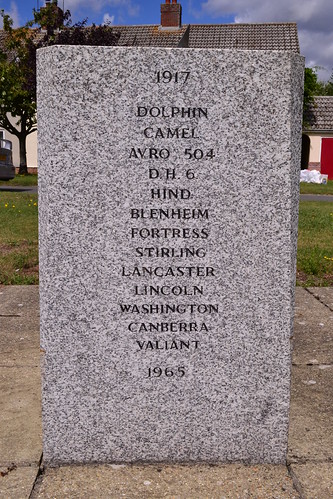
Beneath the sundial, all the aircraft used by 90 squadron.

In July 2021 I was contacted by Herb Zydney who was stationed at the former RAF Tuddenham in the mid 1950s, he kindly sent some photos and has since sent the original road sign ‘home’ to remind us of RAF Tuddenham. Hopefully this will be suitable displayed. 

RAF Tuddenham road sign

The original road sign to Tuddenham airfield. It has since been returned to Tuddenham for display. (Photo courtesy Herb Zydney)

On leaving Tuddenham, carry on in a south-easterly direction toward Bury St. Edmunds and follow the A14 east. Passing Bury, we arrive at an industrial area on your left. Here we discover an aviation dream world see Trail 16.

Sources and Further Reading.

*1 National Archives AIR 27/731/25

*2 Grehan. J. & Mace. M. “Bomber Harris – Sir Arthur Harris’ Despatch on War Operations“, Pen & Sword, 2014

*3 No. 138 Squadron RAF went on to be the first ‘V-bomber’ squadron of the RAF, flying the Vickers Valiant between 1955 until being disbanded in 1962.

*4 Personal stories of personnel from 90 Squadron at Tuddenham can be found here on the Wartime Memories Project website.

*5 Williams, G. “Flying Through Fire – FIDO The Fogbuster of World War Two“, Alan Sutton Publishing. 1995 (An excellent book detailing the work on FIDO and its installations at each airfield).

National Archives: AIR 27/733/3; AIR 27/733/4

My thanks to Herb Zydney for the You Tube video and photos, they are very much appreciated.

RAF Tuddenham – The last of the FIDOs (Part 1).

In this trail we return to an RAF bomber airfield which opened later in the war. With a relatively quiet start, it soon became a front line base operating the four engined heavies the Lancasters of Bomber Command. Within a short time of it opening, it would become one of only a small number of airfields that would use the cleverly designed fog clearing system FIDO, a system that allowed aircraft to take-off and land in difficult weather conditions. As a result, it became a safe haven on more than one occasion. 

In Trail 16 we return to RAF Tuddenham.

RAF Tuddenham

Tuddenham (as opposed to the decoy site North Tuddenham) is one of those places that is today surrounded by large towns. To the north-east lies Thetford, to the south-east, Bury-St.-Edmunds and to the south-west that mecca of horse racing – Newmarket. As a result, the landscape of the area today is somewhat different to what it was in the 1930s and 40s.

Using land requisitioned in 1943 it was opened that same year. A standard Class ‘A’ airfield, its main runway ran south-east to north-west and was the standard 2,000 yards in length. With two secondary runways both of 1,400 yards, it would open under the control of 3 Group Bomber Command. For its protection it had its own decoy site built a short distance away at Cavenham, but even this didn’t stop attacks on the airfield, none of which thankfully caused any major damage.

Built by Taylor Woodrow, it would have two T2 and later one B1 hangar, with thirty-eight loop style hardstands and a perimeter track of the standard 50 yards width. A standard watch office for all commands (design 12779/41) was later redesigned to match the new war-time standard 343/43 design which had the smaller windows especially designed for bomber airfields.

RAF Tuddenham

Tuddenham village sign showing its links to a once active airfield.

Accommodation for air and ground crews was located on land to the south of the airfield spread across twelve sites. A mix of huts, they would accommodate around 2,000 personnel of which some 250 were WAAFs. Built as temporary buildings, these huts were unheated and unhomely, they were cramped and cold and as such, Tuddenham was not one of the most popular stations with crews posted there.

A fairly nondescript airfield, it was first frequented by the RAF’s 90 Squadron with the huge Stirling MK.III. 90 Squadron in name, had been in existence since 1917 although it had been disbanded and reformed on no less than four previous occasions, and had been at a variety of locations before arriving here at Tuddenham. This time however, it would be a much more permanent formation, and for the duration of the war it would reside at only one station, that of RAF Tuddenham.

90 Squadron had previously been recreated to test the suitability of B-17s for RAF service. Initially based at Watton, it would be less than a year before they were disbanded once more. Their more recent reincarnation led them to Wratting Common, from where they departed on their journey to Tuddenham on October 13th 1943.

According to the official records*1, this move was ‘worked out in every detail‘ and it went ‘expeditiously without incident‘ even though the airfield was still in a state of non completion. 90 Squadron’s first operational mission from Tuddenham occurred on the 17th, a return to mine laying off the Frisian Islands. Classed as ‘minor’ operations three aircraft were ordered to fly that day, one of which had to return early due to being struck by lightning and suffering damage to a number of areas including the rear turret. With only three other mining operations and an air-sea rescue search that month, the move to Tuddenham would have been uneventful had it not been for an accident involving Stirling EF497, piloted by Sgt. Wallace Jones who was aged just 21. The crew of the Stirling were on an air test when the aircraft struck trees just close to RAF Benson in Oxfordshire. As a result, all of the crew, of which three were in the RCAF, died in the ensuing crash. 

With only two other operational losses before the year was out, the Stirlings of 90 Sqn were not fairing as badly as many other units, but the days of the type were indeed now numbered as losses overall in 3 Group were high. The Stirling would soon be relegated to secondary duties completely. 

December 1943 would see a major installation take place at Tuddenham. By now, the fog dispersal system FIDO, was in place across several other British airfields and was proving to be a major breakthrough in poor weather flying.

Designed after pre-war investigations into ways of dispersing fog, it led to oil burners being laid along a mile length of the main runway at Tuddenham. Where these crossed secondary runways, the burners were entrenched and metal plates placed over the top to prevent aircraft using these runways, from having an accident. 

At Tuddenham (classed as FIDO Station XIX), the Mark IV Haigill burners were used, each burner was 40 yards in length and made of three pipes looped at the ends. Oil was fed into the burner via a feed pipe from the main pump on the southern side of the airfield. 

Supplying these burners took huge quantities of oil, this was brought in on the nearby railway which passed through the village of Higham. A special siding was constructed which could take a large number of wagons from which fuel was pumped into a small pumping station. From here, it would then cross several fields via underground pipes into one of three large storage tanks capable of holding around half a million gallons of fuel in total.

Work began at Tuddenham early in the new year 1944, and again Taylor Woodrow were charged with the task of carrying out the construction. By August, they were ready and stocks had begun arriving ready for a test burn.

Location unknown. FIDO burners alongside a runway 1945. © IWM CH 15274

FIDO amazed all those who saw it for the first time. Its ability to clear not only fog but low cloud as well, was a god send to those who were unfortunate enough to have found themselves lost in the thick of it. The first use of FIDO at Tuddenham was on August 8th 1944, when by pure accident, an American B-26 ‘Marauder’ was caught by fog. On that day, a test burn was planned, the burners were lit and the amazed onlookers watched as both fog and low cloud began to clear. Suddenly, out of the darkness and murk came the B-26, who had attempted to land elsewhere no less than eight times unsuccessfully. Seeing the bright blaze of Tuddenham’s burners, the pilot made for the airfield, flew over it to ascertain what it was, and once satisfied, made a successful wheels up landing. 

FIDO would be used regularly over the next few months, in November it provided a safe haven for both RAF and USAAF aircraft. In Geoffrey Williams’ book ‘Flying Through Fire‘, he quotes one pilot as stating he could see Tuddenham’s FIDO “from Ostend at 7,000 ft“, a point that illustrates the effectiveness of FIDO in poor conditions. 

The idea behind FIDO was to install it at a number of airfields that were located in a ‘hub’ of other airfields, thus keeping returning aircraft as close to their parent airfield as much as possible. It allowed returning aircraft to land (and take off) safely in poor or deteriorating weather conditions, but it was used ‘sparingly’, as in one day’s total of 6 hours burn, some 200,000 gallons*5 of fuel had been used. Not many sites actually had FIDO installed, just fifteen in the UK, eleven of which were Bomber Command airfields. However, FIDO was undoubtedly successful, these fifteen alone enabled somewhere in the region of 2,500 safe landings that would have no doubt led to a number of casualties or even deaths had it not been available. The airfields were very much appreciated by those who were caught out when returning from raids over Europe, the only major complaints being glare from the bright fires as aircraft came into land*2

RAF Tuddenham

South of the airfield lay the Squash court and Gymnasium.

Back in early 1944, Tuddenham’s operations continued, the Stirlings of 90 Sqn were soldiering on. More mining operations and bombing raids on the French coast dominated the months of January and February, whilst ‘special duties’ (SOE supply operations) took over as the main focus from March to May. By this time the Stirlings were starting to be replaced by the Lancaster, as it was now being relegated universally to secondary operations: supply sorties, paratroop transport and mining operations off the European coast. 

This transition began on May 11th, with pilots gaining initial experience by flying as 2nd pilot in other squadrons. New crewmen were soon being posted in, many of these from Conversion Units, whilst 90 Sqn’s Stirling crews were posted out. The continual cycle of trained crews coming in and ‘untrained’ crews going out filling the record books.

During all this operations continued on, and Stirlings continued to be lost. Four aircraft were shot down in May, three of them, on the two consecutive nights between the 8th and 10th, with many of the crewmen either being killed or captured.

The last Stirling to be lost on operations for 90 Sqn was on the night of June 2nd / 3rd when EF294 ‘WP-B’ crashed in France in the early hours of the 3rd. Of those on board, two managed to evade capture whilst the remaining five were caught and imprisoned in POW camps. 

With the invasion of Normandy on June 5th/6th, four Lancasters and fifteen Stirlings were prepared for operations in connection with the landings, but the Lancasters were withdrawn – perhaps to the annoyance of those on board. The Stirlings all took off and carried out their mission successfully, each one returning to Tuddenham safely. 

The last Stirling only operation took place on June 7th, the last two aircraft to return landing at Newmarket after completing their special operations. The Lancaster would now take over as the main aircraft and so 90 Squadron would soon return to bombing operations once more.

RAF Tuddenham

A sundial on the village green remembers the crews of 90 Squadron RAF.

In Part two the Lancaster arrive, but it is not the most auspicious of starts for the squadron. 

Flt. Lt. William ‘Bill’ Reid VC 61 Squadron, RAF Syerston

In 1942 Air Ministry Directive S.46368/D.C.A.S. turned Bomber Command’s focus to the morale of the German population and in particular its industrial workforce. Bomber Command now turned to strategic bombing, a controversial campaign that was debated for many years after, it was seen as a way to destroy the enemy’s industrial output, by attacking the very workforce that produced it.

William Reid VC.jpg

Flt. Lt. Bill Reid VC (IWM CHP 794)

But as loses had mounted, Bomber Command had been forced to fly at night, a task that was almost impossible to satisfactorily achieve for most bomber crews who had been trained to bomb in daylight. Indeed, only some 3 in every 100 bombers were hitting within 5 miles of the aiming point at the start of the campaign.

Harris himself knew that hitting a single target consistently, at night was impossible, and so there was little choice seen other than the controversial bombing campaign.

On one of these raids, on the night of 3rd/4th November 1943, Bomber Command sent a large raid of almost 600 aircraft to Germany. In that raid was Acting Flight Lieutenant William (Bill) Reid, a Scot born in Baillieston, Glasgow, and the son of a Blacksmith .

Reid performed his duties that night in a manner that would see him earn the Victoria Cross, the highest honour possible, for taking his damaged Lancaster to the heart of Dussledorf and bombing the target even though he himself and his Flight Engineer were wounded; the navigator killed and the aircraft severely damaged and so difficult to fly.

That evening, eleven Lancasters from 61 Squadron, RAF Syserton, took off on a mission to bomb Dusseldorf. Reid’s aircraft, Lancaster LM360 was second to depart taking off at 16:59. On board with Flt. Lt. William (Bill) Reid were: Sgt. J. Norris (Flt Eng); Flt. Sgt. J. Jeffries (Nav); Sgt T. Rolton (Bomb Aimer); Flt. Sgt. J. Mann (WT/ Air Gunner); Flt. Sgt. S. Baldwin (Air Gunner) and Flt. Sgt. A. Emerson (Air Gunner).

As the aircraft crossed the Dutch coast there was a terrific bang outside the aircraft  which resulted in the windscreen being shattered and partially blown out. Reid was wounded in the head, shoulders and hands, and the plane temporarily went out of control. Flak continued to burst all around the Lancaster with one further burst injuring the Flight Engineer, who was next to read, and causing further injuries to Reid himself. The port elevator had been shot away and to compensate, Reid had to pull the stick fully back just to keep the plane straight and level. Between Reid and the Flight Engineer, they maintained level flight as part of the formation of almost 600 aircraft across an 8 to 10 mile span of up to 6000 feet deep – the option of turning back was not a viable one.

Keeping the plane straight and level, Reid watched the target indicators. The bombs were dropped and the photographic evidence taken. Turning the aircraft away, the Lancaster headed for home. Reid knew that he was the only one who could fly the aircraft and even with with no elevator, virtually no instruments and at night, he was determined to make it back safely. With further attacks from night fighters on the return trip, it was not an easy journey, but they eventually made it to England. Once over the English coast they looked for a suitable airfield to land, they came across the beacons at the American base at RAF Shipdham in Norfolk, and Reid put the aircraft down. Almost immediately, the legs of the undercarriage collapsed and the aircraft hit the runway on its belly, sliding along for some 50 yards or so, before coming to a complete stop. At this point Reid realised the Navigator had died slumped in his seat behind him.

Reid, severely injured, had managed to fly the badly damaged aircraft, without oxygen and with wounded on board, for many hours from deep inside Germany, the actions of which earned the 22-year-old acting Flight Lieutenant the Victoria Cross.

His citation in the Third Supplement to the London Gazette on Tuesday 14th December 1943 covered an entire page and read:

Air Ministry, 14th December, 1943.

The KING has been graciously pleased to confer the VICTORIA CROSS on the undermentioned officer in recognition of most conspicuous bravery: —

Acting Flight Lieutenant William REID (124438), Royal Air Force Volunteer Reserve, No. 61 Squadron.

On the night of November 3rd, 1943, Flight Lieutenant Reid was pilot and captain of a Lancaster aircraft detailed to attack Dusseldorf.

Shortly after crossing the Dutch coast, the pilot’s windscreen was shattered by fire from a Messerschmitt 110. Owing to a failure in the heating circuit, the rear gunner’s hands were too cold for him to open fire immediately or to operate his microphone and so give warning of danger; but after a brief delay he managed to return the Messerschmitt’s fire and it was driven off.

During the fight with the Messerschmitt, Flight Lieutenant Reid was wounded in the head, shoulders and hands. The elevator trimming tabs of the aircraft were damaged and it became difficult to control. The rear turret, too, was badly damaged and the communications system and compasses were put out of action. Flight Lieutenant Reid ascertained that his crew were unscathed and, saying nothing about his own injuries,
he continued his mission.

Soon afterwards, the Lancaster was attacked by a Focke Wulf 190. This time, the enemy’s fire raked the bomber from stem to stern. The rear gunner replied with his only serviceable gun but the state of his turret made accurate aiming impossible. The navigator was killed and the wireless operator fatally injured. The mid-upper turret was hit and the oxygen system put out of action. Flight Lieutenant Reid was again wounded and the flight engineer, though hit in the forearm, supplied him with oxygen from a portable supply.

Flight Lieutenant Reid refused to be turned from his objective and Dusseldorf was reached some 50 minutes later. He had memorised his course to the target and had continued in such a normal manner that the bomb-aimer, who was cut off by the failure of the communications system, knew nothing of his captain’s injuries or of the casualties to his comrades. Photographs show that, when the bombs were released, the aircraft was right over the centre of the target.

Steering by the pole star and the moon, Flight Lieutenant Reid then set course for home. He was growing weak from loss of blood. The emergency oxygen supply had given out. With the windscreen shattered, the cold was intense. He lapsed into semi-consciousness. The flight engineer, with some help from the bomb-aimer, kept the
Lancaster in the air despite heavy anti-aircraft fire over the Dutch coast.

The North Sea crossing was accomplished. An airfield was sighted. The captain revived, resumed control and made ready to land. Ground mist partially obscured the runway lights. The captain was also much bothered by blood from his head wound getting into his eyes. But he made a safe landing although one leg of the damaged undercarriage collapsed when the load came on.

Wounded in two attacks, without oxygen, suffering severely from cold, his navigator dead, his wireless operator fatally wounded, his aircraft crippled and defenceless,  Flight Lieutenant Reid showed superb courage and leadership in penetrating a further 200  miles into enemy territory to attack one of the most strongly defended targets in Germany, every additional mile increasing the hazards of the long and perilous journey home. His tenacity and devotion to duty were beyond praise.

Reid would go on to fly in Bomber Command being transferred to the famous 617 Sqn at Woodhall Spa after his recovery. Here he would fly with Leonard Cheshire, another VC holder, on Tallboy missions, dropping the enormous weapon onto heavily fortified or deeply buried structures.

On 31st July 1944, sixteen Lancasters and two Mosquitoes of 617 Sqn were ordered to attack the V-1 site at Rily-la-Montage, a railway tunnel used by the Germans to store the pilot-less flying bombs ‘The Doodlebug’.  Here Flt. Lt. William ‘Bill’ Reid’s luck would finally run out.

He had managed so far to evade either death or capture, only to be struck down by bombs from one of his own. The Lancaster Mk.I (ME557) ‘KC-S’ he was flying with 617 Sqn, shuddered as allied bombs crashed through the Lancaster severing the control cables, fracturing the structure of the Lancaster’s body and removing one of the port engines. Uncontrollable, the aircraft then entered a spin. Reid gave the order to bail out, himself escaping through the hatch above his head. He landed heavily, breaking an arm in the process – an injury that would hinder his escape from his pursuers. Within an hour he was captured, interrogated and sent on to a POW camp. Reid and one other crewman, Flying Officer D. Luker, were the only two airmen to escape the stricken  Lancaster, the remaining five all being killed in the crash.

As the allied forces moved ever closer, the much admired Reid was moved from camp to camp, ending his war at Stalag III – a POW camp made famous by ‘The Great Escape’ and ‘The Wooden Horse’.

Back at the RAF Woodhall Spa in Lincolnshire, he colleagues ‘mourned’ his capture by joking that he had escaped with all their money, money he had won in an early morning card game in the officers mess at the Petwood Hotel. *1.

Liberated in May 1945, Reid returned home and became well known in the agricultural business. He became great friends with the that other Scottish VC holder John Cruickshank a friendship that lasted a good many years.

Some time after moving to his new home in Crieff, Bill Reid sadly passed away; his death being announced  on November 28th 2001. He was buried in the local cemetery at Crieff.

Sources and Further Reading.

National Archives AIR 27/578/22
National Archives  AIR 27/2128/24
National Archives  AIR 27/2128/23

The Third Supplement of The London Gazette Publication date: 10th December 1943; Supplement: 36285 Page: 5435

World At War Series BBC narrated by Lawrence Olivier Episode 12

*1 Sweetman, J. “Bomber Crew – Taking on the Reich“, Abacus, 2004 pg 207

The Scotsman Newspaper website, 29th November 2001.

RAF Watton – The origins of ECM (Part 2)

In part 1 we saw how Watton had been built as a pre-war expansion period airfield and how the Blenheims that were stationed here were decimated in the face of a superior enemy. Eventually begin withdrawn, they were simply outclassed.

Eventually, the airfield like so many in this area, was handed over to the Americans. It was re-designated and would take on a different role. Watton would now grow and develop.

The USAAF renamed the airfield Station 376, they redeveloped the accommodation blocks, added more hardstands and laid a steel mat runway. The original hangars were added to so that there were now not only the original ‘C’ types, but also the more modern ‘B1’ and ‘T2’ types, along with three smaller blisters hangars. In 1944, the steel matting was removed and a concrete runway built in its place. The airfield’s history would now become a little more complex as it officially became two sites utilising the same single runway.

The main airfield itself would house aircraft of the 802nd Reconnaissance Group (Provisional), who were later renamed the 25th Bomb Group (Reconnaissance). Whilst on the southern edge of the site, a new complex was built for the repair and refurbishment depot the 3rd Strategic Air Depot (SAD). This complex grew so large that it became a site in its own right, gaining the designation Neaton (Station 505). The name has been somewhat confusing however, as the site was actually closer to the village of Griston that it was to Neaton.

A collection of B-24 engines removed from their mounts. (IWM UPL 5385)

The role of the 3rd SAD was to maintain and repair the battle damaged B-24s of the 2nd Air Division, that had by now, flooded into the UK from the United States. This unenviable task required the recovery of the heavy bombers, washing them out and  perhaps removing the remains of airmen before returning them to flyable condition once more. Whilst not designed to be so, the acronym SAD certainly reflected the role perfectly.

Neaton consisted of a number of sites, 4 accommodation sites, a communal site, a sick quarters, two motor sites, a ‘miscellaneous’ site housing a Steam Jenny and then a 9AD site with tool sheds and other maintenance related buildings. The majority of these accommodation sites incorporated either the more common Laing or Nissen huts.

Watton itself would now become synonymous with reconnaissance, surveillance and electronic countermeasures (ECM). A new unit, 25th Bomb Group (Reconnaissance), it was constituted on 17th July 1944, and activated in England on 9th August that year. They would only serve from one UK airfield, that of Watton, where they would stay until VE day serving under the umbrella of the 8th Air Force. A visit by the famous ‘Carpetbaggers‘ (the special operations group designed to support French resistance operations) also saw the black Liberator’s fly regular missions from here during this time.

The end of Mosquito PR Mk XVI “M” NS774 of the 25th BG after crashing at RAF Watton (Station 376) 25th March 1943. (IWM UPL 6964)

The role of the Watton Group was to carryout reconnaissance missions over the seas around Britain and the Azores, gathering meteorological data. Combined with flights over the continent, the information they would gather, would help in the preparation of bombing missions. They would also carryout aerial mapping and photo reconnaissance missions, identifying German troop movements both at night and during the day.  Many of these operations involved major battles, including northern France, the Rhineland and the Ardennes. Additional tasks included electronic countermeasures using ‘chaff’, and flying ahead of large formations to ascertain last minute weather reports. A varied and dangerous collections of roles, they used a number of aircraft types including: B-17s, B-24s, B-25s, B-26s and P-38 Lightnings.

When VE day did finally arrive, the American unit departed returning to Drew Field in Florida. The August of that year must have been quite surreal, as the Americans left, flying was reduced and Watton was returned back to RAF ownership.

With the war now over, flying units began to return to the UK, many being disbanded not long after. One such unit was 527 Sqn who arrived here in the November, only to be disbanded in the April of 1946.

The next four years saw no other front line ‘operational’ flying units here at Watton, but the 1950s would bring a number of units back through its gates. With the introduction of the jet engine at the end of the war, piston engines fighters were soon being replaced by newer designs.

RAF Watton

One of Watton’s many accommodation blocks in modern use.

The ECM activity initiated at Watton by the 25th Bomb Group, would continue on in these early post-war years. For some twenty years or so in fact, through a variety of aircraft including: the Mosquito, Wellington, Domine, Lincoln, Anson, Proctor, Canberra, Meteor, Sea Fury, Firefly, Venom and many others. Each of these would not only play a vital part in the development and use of ECM, but radio research and training as well. Warfare had taken on a very new twist.

This move would see Watton becoming a hub for ECM activity. A number of RAF and Naval squadrons would operate from here undertaking such tasks. At the end of the war, Watton had become home to the Radio Warfare Establishment (RWE), renamed in 1946 to  the Central Signals Establishment (CSE). It was only one of five such units operating jointly between the military and National Air Traffic Services Organisation (NATS).  The Navy and RAF would jointly use Watton at this time, albeit for only a short period of time between March and September 1947, when the Naval Air Warfare Radio Unit moved in under the disguise of 751 NAS.

The role of the CSE was very complex, for too complex to discuss here, but with a number of squadrons operating under different roles whilst at Watton, it would culminate in 1948 in the forming of three un-numbered units: a Signals Research Squadron, a Monitoring Squadron and a Radio Countermeasures (RCM) Squadron. In essence, their role was to monitor and jam Soviet electronic communications and defence systems – it was an total airborne electronic warfare operation.*1

But the use of un-numbered squadrons was short lived, by the end of the decade the CSE had reverted to using numbered squadrons once more, their role to probe the air defences along the Soviet borders. British aircraft combined with ground stations, would monitor the reaction and activity of Soviet communications, seeing how they responded to intrusions into their airspace. By knowing this detail,  countermeasures could be put in place to jam or scramble these communications, ideally rendering them useless or at least temporarily incapacitated. The first of these numbered squadrons were 192 and 199, who were originally  the calibration and training units of the CSE.

Reformed here in July 1951 flying Mosquitoes, Lincoln B.2s and then the enormous Washington (B-29), 192 Sqn would not receive their first jet until January 1953 when the Canberra B.2 arrived. 192 Sqn would also fly the Varsity and the Comet C.2 before being disbanded and renumbered as 51 Sqn in August 1958.

199 Squadron (reformed on the same day) flew both the Lincoln B.2 and the Mosquito NF.36, in the same role as 192; their stay lasting until April 1952, at which point they moved to Hemswell in Lincolnshire where they picked up their first jet engined aircraft.

The August of 1952 saw a number of other units reform, disband or pass through Watton. 116 Sqn were reformed on the 1st, another ex Calibration flight of the CSE, it stayed until August 1958 when it was disbanded and reformed as 115 Sqn. A battle hardened squadron from Bomber Command, they had since themselves been disbanded. No longer flying operational bombers, the Varsitys 115 Sqn would operate would be the new form of transport, as they were reformed and moved on within days of their inception in that August.

On that same day in late August 1958, 245 Sqn would reform, also from the renumbering of another squadron – 527 Sqn. Flying Canberras they too were gone within days of their reformation.

As 1959 began to close and 1960 dawned, Watton would become the home of a new unit, 263 Sqn, who were operating Bloodhound missiles, the RAF’s ground to air missile used to defend Britain’s airfield against attacking aircraft. The operational use of these giant weapons lasted here until June 1963.

The 1960s saw the last of the flyers, lasting only between January 1962 and May 1963, 151 Sqn operated from here as the Signals Development Squadron, bringing back the props of the Hastings, Lincoln and Varsity before being renumbered again and subsequently disbanded.

Other units at Watton included 97 Sqn from 1963 – 1967; 98 Sqn (1/10/63 – 17/4/69), 360 Sqn (1/10/63 – 17/4/69) and 361 Sqn (2/1/67 – 14/7/67) two of which were both reformed and disbanded at Watton.

As can be expected, there were a large number of subsidiary and support units based at Watton, many of these attached to the Radio Warfare Establishment, along with SAM Training units, a range of flight units and other various regiments.

RAF Watton

Part of the disused Eastern Radar complex.

By the 1970s all flying had ceased leaving Eastern, and latterly Border Radar, the only ‘operational’ activity on the site. Eventually of course, even these were moved in the early 1990s, signalling the demise of the airfield as an active base. Watton was then handed over to the British Army.

A few years later the Army also reduced it use of Watton and the accommodation areas were sold off for private housing; a move that helped retain that airfield ‘feel’ that it still maintains today. More of the site was then sold later and new housing estates were built on the land where this previously stood; the entire feel of this has now since gone, replaced instead by a rabbit warren of roads with boxes for houses. The last remaining parts of the main airfield were sold off in 2012, the runway and peri-track being retained by the farmer and used for agricultural purposes.

Neaton too was sold off and has now been replaced by HMP Wayland, a prison holding category ‘C’ prisoners at her majesty’s pleasure.  One gruesome part of history being replaced by another.

Today, the perimeter tracks, runways and hard standings support nothing more than housing. A proportion of the perimeter track remains with a small wire fence being the only defence to the continued onslaught of development. The original 4 “C” type hangars were all demolished as were the two control towers, one of which was built to support the new jet-era. Some minor buildings continue to remain surrounded by the original RAF housing, but these are few and far between, and even their future is uncertain.

Almost as lip service, many roads are named after an aircraft, Liberator, Marauder, etc., those aircraft synonymous with the operations of Watton and Neaton. Various concrete remains poke through the undergrowth and make this part of the site rather untidy. How long is it before they too disappear?

The site is split by the main road with some of the former administration buildings remaining on one side with the airfield and accommodation on the other. Some of these buildings are still in use with civilian operators and as such, have been well-preserved; others such as the technical site, have not been so fortunate and have become very rundown and in high states of disrepair.

RAF Watton

Memorial to the 455th AAA ‘The Rabbs’ located on the airfield site.

As for the airfield itself, two small memorials ‘guard’ the entrance to the new development. On the one side is the bent propeller recovered from a crashed Blenheim (R3800) shot down in the loss of eleven aircraft over Aalborg on 13th August 1940; on the other side a memorial that commemorates the 25th Bomb group USAAF. On the original housing site itself, a further memorial commemorates the 455th AAA ‘The Rabbs‘ who were given the task of defending Britain’s airfields against the Luftwaffe.  Owned by Stanford Training Area (STANTA) for a period of time and used for air mobile training, the odd Hercules or Army helicopter might have been seen here. However, this has now ceased and housing is creeping ever closer. I’m sure it won’t be long before many of these remaining remnants are lost to the developer’s digger.

Sources and Further Reading.

*1 Flintham, V., “High Stakes: Britain’s Air Arms in Action 1945-1990Pen and Sword, Oct 2008.

National Archives AIR 27/263/1: AIR 27/263/2

A website dedicated to RAF Watton has an extensive range of personal stories and information about life at Watton. It also has a video of the retrieval of Blenheim R3821 being recovered from Aalborg airport.

Further Pictures of the remains at these sites can be seen on Flckr.

NB: There is a museum commemorating the lives of the Watton personnel, open on limited days only, details can be found on their website.

Watton can be found on Trail 9.

RAF Watton – The origins of ECM (Part 1)

Norfolk once boasted many major airfields, virtually all of which are now closed to military flying. Marham is the only major survivor spearheading the RAF’s front line fighter force, in conjunction with Lincolnshire’s RAF Coningsby and RAF Lossiemouth in Moray, Scotland.

However, during the Second World War the Norfolk landscape was very different; it was littered with front line airfields, composed mainly of light bomber and fighter squadrons, all of which could be found with relative ease.

One such airfield was that of Watton. Used by a range of light and heavy aircraft, its history was chequered, bearing witness to some of the more gruesome aspects of the air-war.

Today it is a housing estate, the single runway remains and is used for storage, the hangers and technical buildings have gone and the accommodation areas have all been sold off. That said, the perimeter track remains in part, the ‘feel’ of the airfield hangs over the area and a number of memorials pay silent tribute to those who served here.

Found on the edge of the town of Watton in Norfolk, we go back to this once busy RAF base and see what has changed, and relive the life of RAF Watton.

RAF Watton (Station 376)

RAF Watton, located some 11.5 miles north-east of Thetford, opened in 1939 as a medium bomber station with the RAF. Unusually it only had one runway, a grass example, which was later extended to 2,000 yards and crossed the airfield in an east-west direction.

The late 1930s saw a massive expansion of Britain’s military might, and in particular, its airfields. With little foresight into what lay ahead, these pre-war and early war airfields were not designed, nor built, as dispersed sites. Once the realisation of what the war would bring hit home however, later examples would be dispersed, giving a new dimension to airfield design. As a result, Watton (built by the John Laing company) was constructed with much of the accommodation block, technical area, hangars and so on, all being placed closely together on one single site.

Housing for the personnel was located in the north-western corner, with the technical area just east of this. The bomb dump, an ideal target, was further to the east of this area. Four ‘C’ type hangers were constructed each having a span of 150 feet, a length of 300 feet and a height of 35 feet. Whilst Watton was a medium bomber airfield, and thus aircraft were relatively small, it was envisaged at this time that larger, heavier bombers would soon come on line, and so foresight deemed larger than necessary hangar space be provided. A 1934/35 design, these hangars would be common place across expansion period airfields.

Another architectural design found at Watton was the redesigned Watch Office, an all concrete affair built to drawing 207/36, it was one that would very quickly become inadequate, requiring either heavily modifying or, as was in many other cases, replacing altogether.

RAF Watton

Part of Watton’s decaying perimeter track.

Partially opened in 1937, the airfield wasn’t fully completed and handed over to the RAF until 1939. Being a pre-war design, building materials were in good supply, and so the  accommodation blocks were constructed using brick, and they catered well for those who would find themselves posted here.

Another aspect considered at this time was that of camouflage; airfields were enormous open expanses and could be easily seen from great distances and heights. Numerous proposals for hiding them were put forward, a move that resulted in the formation of a special unit within the Directorate of Works led by Colonel Sir John Turner. Watton came under the eyes of Sir John and his department, and this led to an ingenious camouflage pattern of fields and hedges being painted across the entire airfield,  thus disguising it from prying eyes above. Whilst not completely effective, it certainly went some way to protecting it from attack.

RAF_FNO_22_RV_6040

Watton airfield taken in 1942 by No. 8 Operational Training Unit. The four hangars can be seen in the centre of the photo with the patchwork of ‘fields’ disguising the main airfield. English Heritage (RAF Photography).

The first postings to arrive were the men and machines of 21 and 34 Squadrons RAF. Their arrivals on March 2nd 1939 saw a reuniting of both squadrons under the Command of Group Captain P. J. Vincent DFC and 6 (B) Group . On the 7th, the airfield was inspected by the Group’s AOC after which 34 Sqn performed a flypast; one such event that would be the start of many visits from numerous dignitaries including the Marshall of the Royal Air Force himself, Sir Edward Ellington  GCB, CMG, CBE.

Little flying took place by either squadron at this time however, as the aerodrome was soon unserviceable due to the very poor British weather. Grass runways soon became bogs, and as was found across many grassed airfields at this time, unsafe for aircraft to either take off or land without mishap. From April  things picked up slightly, and intensive training began in the form of station tactics and defence exercises. The weather would however, continue to be the worst enemy, repeatedly preventing or restricting flying from taking place.

In August, 34 Sqn received orders to depart Watton and  proceed to Singapore, and so on the 12th, the air and ground parties began their long transit leaving Watton and England far behind. The quiet of their departure would not last ling however, as within a few days of them leaving, their empty beds would be filled once more, when the Blenheims and crews of 82 Sqn arrived.

At 11:05 on September 3rd 1939, notification came though to Watton of Britain’s declaration of war. Within days of the announcement aircraft were being moved out under the ‘Scatter’ scheme to another airfield, Sealand, for there was a fear of imminent air attacks following the war’s declaration. The Blenheims remained at Sealand until mid September, at which point they were recalled and prepared for attacks on vessels belonging to the German Navy. These vessels were not located however, and so the order to stand by was cancelled and the crews stood down. This would sadly become a regular and frustrating occurrence for the men of 21 Sqn.

Shortly after on the 9th, the first of the new MK.IV Blenheims were collected from Rootes Ltd at Speke, with further examples arriving over the next few days. Further movements saw aircraft detached to Netheravon and then onto Bassingbourne where Blenheim L8473 was damaged as it ‘nosed over’ whilst taxiing. A minor, but unfortunate accident, it would be the first of many more serious losses for the squadron.

RAF Watton

A fence separates the housing estate from the airfield remains.

On 26th September, another order came through for aircraft of 21 Sqn to stand by to attack  the German fleet, whilst a further two Blenheims (L8734 and L8743) would fly to the Rhur to carry out a photographic reconnaissance mission. However, bad weather, industrial smoke and a faulty camera prevented both aircraft from carrying out their duties: each one returning to Watton empty handed but unscathed – crews reporting heavy flak over the target area. The whole of October and November were pretty much a wash-out. Bad weather with prolonged heavy rain prevented any substantial flying beyond the local area. Air gunnery and co-operation flights were carried out whenever  possible, but the late months of 1939 had certainly been a ‘phoney war’ for 21 Sqn.

As 1940 dawned, things on the continent began to heat up and ground attacks increased for both Watton squadrons. Low-level sorties saw them attacking troop formations and enemy hardware as its galloped its was across the low-countries. Whilst bravely flying on and escorted by fighters, overall loses for the slower Blenheims of 2 Group were beginning to rise, a pattern that would only increase in the face of a far superior enemy in the coming months.

These losses were borne out by 82 Sqn in dramatic style on the 17th May, when twelve aircraft took off at 04:50 to attack Gembloux. They were met with heavy anti-aircraft fire and overwhelming fighter opposition – fifteen BF.109s, decimated the squadron. All but one aircraft was lost, the only survivor being P8858 crewed by Sgt. Morrison, Sgt. Carbutt and AC Cleary. Whilst not injured in the melee, the aircraft was badly damaged and as a result, was deemed irreparable and written off. An entire squadron had all but been wiped out in one fell swoop.

This disaster would be reflected right across 2 Group, who had now suffered its greatest overall loss to date, but for 82 Sqn it would not yet be the end of this traumatic and devastating period. The burning cauldron that was now facing the light bomber was taking its toll on crews, who were all at a distinct disadvantage to their Luftwaffe counterparts. On the 21st, three more aircraft were lost from Watton, with one being forced down in France, another lost without trace and a third limping home so badly damaged it also had to be written off.

A short visit by 18 Sqn between 21st and 26th May barely interrupted proceedings at Watton. After returning from France, they had spent no less than nine days in May at five different airfields including the nearby Great Massingham.

By early June 1940 Operation Dynamo had been completed and France was lost. The British Bulldog, whilst not a spent force, had shown her teeth, been bitten hard and was now licking her heavy wounds. Preparations would now begin to protect her own shores from the impending invasion.

Fuelled by revenge, combined attacks by both 21 and 82 Sqn continued on into the summer months. But revenge alone does not protect a crew from superior fighters and heavy flak. On June 11th, three more 21 Sqn aircraft were lost whilst attacking positions around La Mare, it is thought all three fell to Luftwaffe fighters. Two days later on the 13th, another five aircraft were lost, two from 21 Sqn and three from 82 Sqn; losses were mounting for the light bombers and Watton was amongst those bearing the brunt of these. On the 24th, 21 Sqn saw a reprieve, whether to rest crews, take on a new role or simply regroup, they began a move north to RAF Lossiemouth in Scotland. 82 Sqn however, would remain at Watton, where they would carry on with the punishing raids over the continent.

After the arrival and departure of another short stay unit, 105 Sqn between 10th July and 31st October, Watton was now left in the lone hands of 82 Sqn, a situation that would remain until the spring of 1942.

The dramatic loss of eleven crews back in May would come back to haunt 82 Sqn in August that year. On the 12th, another twelve aircraft took off on a high altitude bombing mission to Aalborg in Denmark. The airfield they were to target was well defended, and as if history were to repeat itself, once again eleven of the twelve aircraft were lost. The only one to return, that of R3915 crewed by Sgt. Baron, Sgt. Mason and Sgt, Marriott, turned back early due to low fuel.

In the space of three months, an entire squadron has been all but wiped out not once, but twice, unsustainable losses that would surely bring the squadron to its knees.

RAF Watton

Memorial to the crews lost at Aalborg, 13th August 1940. The propeller of Blenheim R3800, that crashed that day.

It was loses like this that helped convince the authorities to eventually withdraw Blenheims from front line service during 1942 – the Blenheim being long outdated and outclassed. At this time, Watton’s 82 Sqn, would begin their transfer to the Far East, a place they would remain at until the war’s end.

A lull in operations meant that Watton was then reduced to mainly training flights, through the Advanced Flying Unit. Small single and twin-engined aircraft providing the activity over the Norfolk countryside. Many of the crews being trained here would be shipped out to the satellite airfield at Bodney, before returning here for their evening meals.

A brief interlude in the May of 1942 saw the rebirth of the former 90 Squadron, a First World War unit that had gone through this very process on a number of occasions since its inception in 1917.

Flying the American B-17 ‘Flying Fortress’ or Fortress I as it was in RAF designations, 90 Sqn was set up to trial the use of the four-engined heavy for its suitability as an RAF bomber. During the first 15 days at Watton, the squadron gained personnel and received their first aircraft,  after which they moved to nearby RAF West Raynham. Here they would begin these trials which also required the use of a number of smaller airfields in the local area. These included both RAF Great Massingham and RAF Bodney, neither of which were particularly suited to the heavy bombers.

Watton then saw no further operational units, and in the mid 1943, it was handed over to the Americans who began to develop the airfield into something more suitable for their needs. It was now that Watton would take on a more sinister role.

In Part 2 we see how the Americans developed Watton, and how it became two sites rather than just one, and also, how its role in Electronic countermeasure took it into the post war years.

The full story of Watton can be found in Trail 9.